
Loading...
Loading...
Loading...
Loading...
Loading...
Loading...
Loading...
Loading...
Loading...
Loading...
Loading...
Loading...
Loading...
Loading...
Loading...
Loading...
Loading...
Loading...
Loading...
Loading...
Loading...
Loading...
Loading...
Loading...
Loading...
Loading...
Loading...
Loading...
Loading...
Loading...
Loading...
Loading...
Loading...
Loading...
Loading...
Loading...
Loading...
Loading...
Loading...
Loading...
Loading...
Loading...
Loading...
Loading...
Loading...
Loading...
Loading...
Loading...
Loading...
Loading...
Loading...
Loading...
Loading...
Loading...
Loading...
Loading...
Loading...
Loading...
Loading...
Loading...
Loading...
Loading...
Loading...
Loading...
Loading...
Loading...
Loading...
Loading...
Loading...
To add a creator account and complete login using Face Verification, follow the steps below. Make sure the creator is available and ready to complete the verification process in real time.
Go to the Creators section in your dashboard.
Click Connect Creator and select the platform.
Enter the email and password for the creator’s account.
When the verification window appears, click Verify with selfie and select Remember for 30 days.
Copy the link and send it to the creator.
Ask the creator to complete the selfie verification within 1 minute.
Multiple failed attempts may result in a temporary time restriction.
Once the creator has completed the verification, click Complete on your side.
Congratulations, you are done!
If you need help or run into any issues, feel free to contact our Support Team.
When adding a new account to your OnlyMonster agency, a proxy is automatically reserved. For certain platforms — such as Reddit — it’s crucial to use a custom proxy to avoid login issues, platform restrictions, or IP-related blocks.
Enable custom proxy: Toggle the "Use Custom Proxy" option before connecting the account.
For Reddit platform, the credentials input window is always open.
Enter Proxy Credentials: In the field, enter a SOCKS5 proxy credentials:
Host
Port
Login
Once connected, the custom proxy will be automatically applied to the Creator's settings.
Troubleshooting: If you enter non-working proxy credentials, you'll receive a notification about the inability to validate the proxy credentials. Double-check that all fields (host, port, login, password) are entered correctly. If the data is correct and the error persists, it means the proxy itself is not working.
Promo Auto-Renewal is a convenient feature designed to automatically renew your promos and discounts for OnlyFans subscribers.
While both OnlyMonster and OnlyFans offer promotional tools, OnlyMonster’s Promo Auto-Renewal stands out in a few key ways:
Automation: The auto-renewal feature in OnlyMonster automatically renews your promotions. For example, if you set the conditions of a promotion - number of subscribers or duration - it will renew automatically as soon as the conditions are met. This means you don't have to manually restart the promotion after it ends.
The Agency Settings section of your OnlyMonster dashboard allows you to customize the operational details of your agency. It provides you with the flexibility to rename your agency, adjust your timezone, and configure other settings to create a tailored OnlyFans management experience.
The Agency ID is a unique identifier that cannot be changed, while the Agency Name can be edited at any time. This flexibility allows agency owners to adjust their branding as needed.
Password
Connect: Click Connect to continue.
A new window will open with a verification link.
Customization: OnlyMonster gives you more flexibility in tailoring your promo terms. Choose between a free trial or a discount on the first month’s subscription. Just make sure your subscription price after the discount is at least $3.
Advanced Analytics: Track your promo’s performance with in-depth analytics, including fan engagement, revenue metrics, and a complete history of your campaigns. This insight helps you fine-tune your strategy and achieve better results.
Before setting up a promo in OnlyMonster, disable any active promos on OnlyFans to avoid potential conflicts or duplicate campaigns. This will give you more control over your promotional strategy.
To set up auto-renewal, follow these steps:
Go to the Fan Engagement tab and select Promo Auto-Renewal.
Click Create Promo for the paid account you want to promote.
Customize your campaign settings. If you're targeting both active and expired fans, make sure to create separate promos for each.
Click Start Campaign. Your promo will now automatically renew based on the conditions you've set.
To stop a promo that is set to auto-renew, follow these steps:
Navigate to the Fan Engagement tab and select Promo Auto-Renewal.
Locate the active campaign you want to stop and click Stop Promotion.
To ensure accurate data representation and synchronization of your team’s activities, it's essential to set the correct timezone for your agency. You can easily change the timezone by navigating to the "Agency" category in your dashboard. Once set, all team activities, statistics, chatter metrics, transactions, and other relevant data will be displayed according to the selected timezone.
The Fan Insights Settings allow you to control what settings your team members can configure for each fan, ensuring that their interactions are tailored to the fans’ preferences.
Fan Preferences: You can define specific criteria that describe fan interests and interaction preferences. These preferences can be categorized based on various aspects of fan needs, allowing for more personalized engagement.
Additional Fan Sources: This section includes a predefined list of fan sources used for analytics. While these core sources cannot be modified, you have the freedom to enhance the list by adding custom fan sources specific to your agency's operations.
Remember, your Agency Settings are not set in stone! You can always return to this section to make adjustments that better suit your evolving needs. Making the most of these settings will help you get the best results from the OnlyMonster platform.
Manage Account settings allow you to update your account details and ensure its security.
You can access these settings from any Menu tab by clicking on your Profile Picture → Manage Account
This menu is divided into two sections — Account and Security.
In the Account section, you can update your account details and manage the emails linked to your account.
To change your account details — such as your profile photo, first name, or last name — click on the name bar. You can upload a new profile picture from your device using the Upload Image button. Once you've made your changes, press Continue to save them.
To add a new email, click Add an Email Address. After entering the new email, you’ll receive a confirmation code. Once confirmed, the new email can be used to restore your account if needed.
Clicking on the email bar will let you manage the email addresses associated with your account. You can designate one email address as the primary email or delete it from the account. If you delete your primary email, the next available email address will automatically become the new primary one.
The primary email will be used for logging in and receiving emails from OnlyMonster.
In the Security section, you can change your password, enable two-step verification, and manage the sessions where your account is logged in.
To change your password, select Change Password. You’ll need to enter both your current password and the new one, then confirm it. You can Sign out of all other devices to log out of your account on all other devices once the password is changed.
If you forgot your password and need to reset it, check the article for detailed steps to help you out.
In the Security section, you can view detailed information about all devices where your account is currently logged in. To log out from a specific device, select it and click Sign Out of Device.
To enhance the security of your account, enable Two-Step Verification. To do this, click Add Two-Step Verification. Install a convenient two-factor authentication app on your mobile device and use it to scan the provided QR code. Once scanned, confirm the setup by entering the verification code from the app.
Be sure to download and keep a backup of the code. This will help you authenticate in the future if problems arise with the authenticator.
If you can’t scan the QR code, click Can’t scan QR code? and OnlyMonster will provide you with a Key and a TOTP link for your authentication app.
Two-step verification adds an extra layer of security by requiring two steps to verify your identity: your password and a secondary factor, such as a code sent to your phone. This helps protect your account even if your password is compromised.
The Chatter Shifts feature now includes access restriction controls that let you define exactly when team members can access creator profiles. This helps improve security, reduce mistakes, and ensure chatters are only working during approved hours.
When enabled, chatters will only be able to access profiles during their scheduled shifts.
Click here for step-by-step instructions on creating shifts.
Previously, shifts worked only as a scheduling calendar, but chatters could still access profiles outside their assigned hours.
With access restrictions activated, the system now enforces access rules:
Chatters cannot open assigned creator profiles outside their scheduled hours
Profile avatars will appear grayed out with a lock icon when access is restricted
You can enable shift-based access per role.
Once enabled, all team members assigned to that role will only have access during their scheduled shifts.
During an active shift, each profile avatar in the sidebar now displays a countdown timer indicating how much time remains in the current shift.
A green timer appears 5 minutes before the shift starts, counting down to the beginning
A red timer appears 5 minutes before the shift ends, counting down to the end
This visual aid helps chatters stay aware of their shift timing — so they can wrap up conversations or request an extension if needed.
To activate shift-based access control:
Make sure your team is using OnlyMonster version 3.11.0 or later
Navigate to Roles in your admin settings, select the required role and click→ Edit
Enable the toggle "Allow access only during active shifts"
Once enabled, chatters will only have access to creator profiles during their scheduled shift times.
If a chatter is running out of time but needs to finish a conversation, they can extend their shift by 15 minutes directly from the Chatter Shifts panel.
The chatter must have View Shifts permission to extend their shift by 15 minutes
The Edit Shifts permission provides access to creating and editing shifts for all creators the team member can access
The extension option becomes available shortly before the shift ends
This feature ensures better time management and prevents disruption to ongoing conversations while maintaining strict access controls.
Managing all creator accounts in one centralized place is crucial for an agency’s efficient operation.
In the Creators page, you can view all creators and customize each creator’s settings. The OnlyMonster permission system allows you to control which team members have access to specific sections within this area.
In this article, we will explore the following areas: Creators Management Overview - Agency Creators List, allowing you to easily navigate to ➡️ Creator’s Settings - Creator's customization tab.
In the main section, you can see all creators added to the agency.
You can view all your creators or filter them by groups.
Here you can also see:
Creator's ID
Display name and username on OnlyFans
Groups they belong to
To edit a creator, click the blue Open Settings button in the Creators panel. This will take you to the Edit Creator section, where you can customize various settings.
In the Members section, you can see all team members who have access to the creator's profile. You can also assign or revoke access as needed.
On the left, you’ll see the creator’s display name, username, and OnlyMonster ID. You can make notes for each profile.
You can also assign the creator to a group for easy searching and efficient work in the analytical sections.
On the right, you’ll find the creator’s plan information and expiry date. You can select a plan by clicking the Select Plan button, which will take you to the tab where you can manage plans and payments.
This section lets you manage proxies for the creator’s profile - activate and switch proxy when necessary. We recommend activating the Primary Proxy Provider. For the best experience, choose a proxy from a location closest to your team. Active proxy is marked as selected. More information on proxies can be found .
Managing time zones is crucial for coordinating your team. You can set an Agency timezone or choose a custom timezone for individual creator sessions if needed.
If multiple chatters are working on the same creator's page, the Color Chat Splitting feature helps visually separate conversations by assigning distinct colors to each fan based on their fan ID.
You can enable up to 6 different colors, making it easier for your team to manage high-volume chats without confusion.
Go to the Color Chat Splitting section in the Creator’s settings.
Select the number of colors (up to 6).
Switch the toggle to activate the feature.
Click any color block to open the palette.
Select your preferred color.
Click Update Color to apply changes.
Once activated, you’ll see a clear, color-coded separation in the Messages section.
For more details, see our
In this section, you can customize the Emoji Bar. The feature allows you to set a personalized emoji set (up to 15 emojis) for a creator. This ensures consistency across your team.
Click on the desired emoji so they will be added to the upper panel and click Update.
You’ll see the added emoji in the message section.
If the settings are not customized, team members will be able to add and remove emojis from the panel in the messages section on their own.
Below is a full breakdown of permissions available within the Fansly integration. Each permission controls access to specific features and actions.
Feed & Leadboard: Grants access to the content feed, posts and top creators list. When disabled, the member won’t be able to see updates or rankings like Top Supporters.
Profile: Allows for viewing and editing of the profile, including updating profile photo, bio, or links.
Subscriptions: Enables Subscriptions management (start, renew, cancel) and access to the Subscribers tab. When enabled, the user can subscribe to other creators or see their own subscribers.
Adding a creator is the first step to getting started with OnlyMonster’s management system. You only need to connect the creator once — after that, you can manage access for your team without ever sharing login details.
This guide covers creators without Face Verification. For Face Verification accounts, see the .
For a comprehensive overview of all supported platforms and available features, .
Before you start, make sure you're using the OnlyMonster Browser, as it’s required for login and platform compatibility.
The Auto Follow Expired Fans feature in OnlyMonster helps creators and agencies retain their audience by automatically following fans whose subscriptions have expired. This tool reminds former subscribers of your account, increasing the likelihood of their return.
The Auto Follow Expired Fans feature is designed to automatically re-follow fans whose subscriptions to your account have expired. By doing so, it keeps you visible to ex-subscribers, encouraging them to re-engage with your content.
Media Vault & Collection: Grants access to the creator’s media archive, with the ability to upload content directly to custom folders and collections.
Messages: Grants full access to sending and receiving direct messages (DMs).
Notifications: Receive alerts for new messages, purchases, subscriptions and other account activity..
Earnings & Cards
Earnings (Statistics): View detailed breakdown of income (by time period, content type, etc.).
Earnings (Wallet Balance): View current wallet balance.
Earnings (Payout Methods): Set up and manage payout options. Enabling the permission gives access to updating or adding payout methods, as well as access to the Request Payout button.
Earnings (Wallet History): View full transaction history, including tips, purchases, and payouts.
Payment Methods: Manage stored payment options for subscriptions and purchases. Gives access to add, remove, or edit payment options for subscriptions or purchases.
Referrals: Access the referral system and performance tracking. Without this permission, members cannot view referral earnings or track partner traffic.
Statistics
Profile Statistics: View data on profile visibility and conversion rates. When disabled, member won’t be able to see insights about profile visits or subscription conversion data.
Tracking Links: Create and manage tracking links.
Top Supporters: Access to list of top-tippers and most engaged fans.
Profile Settings
Plans/ Promos: Set subscription prices and promotional discounts.
Sessions Management: View and manage all active login sessions and connected devices.
Messages Settings: Customize messaging behavior, including auto-replies, filters, restrictions and ability to unsent mass messages.
Streaming: Access live streaming features.
Uploads: Access to the Upload section in Creators Dashboard which allows for changing the watermark.
Tax Documentation: Access tax forms (W-9/W-8) and earnings reports.
Settings: Access general account settings.
Guides & Support: Access the help center resources and customer support. When disabled, Permission hides Contact Support, Help Center, Merch Store, Creator Guide, Terms, Privacy Policy tabs from the main menu, Chat icon from the top navigation bar.
Logout: Log out of the account.
Purchase Media & Leave Tips: Allows for purchasing content and sending tips to creators (safety-sensitive permission!).
Change Online Status: Toggle between online/offline visibility.
Chat Hiding & Fan Blocking: Hide specific chat conversations and block fans.
Mute Fans: Mute individual fans to stop receiving message notifications.
Create Mass Messages: Send messages to multiple fans simultaneously
Delete Messages: Remove specific messages or entire chat threads.
Create New Post: Publish a new post to the wall/feed.
Create Stories: Post and manage stories.
Edit Profile details: Change display name, personal details, and external links.
Manage Walls: Organize a content wall layout, visibility, categories.
Edit & Delete Posts: Modify or delete previously published posts.

Subscription price on OnlyFans
Session status: Active; Waiting; Inactive.
The active OnlyMonster plan
Settings - by accessing this section, you'll be able to fine-tune the creator’s settings.


Navigate to the Creators section and click the Connect Creator button.
Select the platform of the account you’d like to connect.
Log in to the account you’re connecting by email and password.
Once the Login window opens, you have 15 minutes to log in the profile. If the timer runs out, refresh the page and start over.
If the page has 2-step authentication enabled via an authenticator app or SMS, enter the security code in the corresponding field.
If Face Verification is required, refer to the Face Verification Login Guide. The US proxies are already active on the login window.
After connecting the account, you’ll be offered a 7-day trial with full access to platform features. Click Confirm to activate the trial.
Once you activate the Free Trial, the Creator settings will open. You’ll be able to assign team members, set the proxy and time zone, and make other changes. By default, US proxies are enabled for the Creator. More details are provided in the Proxy Management article.
The account has been successfully connected. You can verify this by checking the account status in the Creators section — an Active status indicates the account is ready for use.
In case of a different status (Inactive or Waiting), please contact the Support Team via the chatbox in the bottom-right corner.
The creator’s icon should now appear in the left sidebar. If the icon doesn’t appear, ensure that the trial is activated. (If you skipped the trial activation step - you can do it in the Creator Settings).
Click on the icon to access the profile.
To delete a creator’s account, please contact the Support Team and provide the creator’s ID (found next to the Creator's Icon), tag or link.
To customize the creator’s settings — please refer to the Creators Management article.
To enable Auto Follow Expired Fans, follow these steps:
Ensure Your Account is Connected and Logged in: Make sure you’re manually logged into your account using your email and password, allowing OnlyMonster to automatically follow former subscribers.
Locate the Creator in the List: In the dashboard, find the creator you want to enable Auto Follow for and click the activation button next to their name in the Auto Follow column.
Automatic Monitoring and Actions: Once enabled, the system will monitor fans' subscription status and re-follow fans when necessary.
The Fan Retention section provides tools and insights to increase audience loyalty. Here’s a breakdown of the key elements in this section:
ID (1): Unique identifier for each creator.
Creator (2): The creator's profile name.
Auto Follow (3): Status of the Auto Follow function.
Last Scanned (4): The most recent update on Auto-Follow status.
Today (5), 7 Days (6), 30 Days (7), Total (8): Activity metrics over different time periods.
Search (9) and View Earnings (10): Quick search and earnings overview.
View Earnings: By clicking on View Earnings, you can view the Auto-Follow Performance. Here, you can track fans who started spending after re-engagement and the total amount of earnings generated by fans re-engaged via the auto-follow feature.
The Fan Retention section equips you with essential tools and information for audience loyalty, helping you retain fans and encourage consistent engagement.
OnlyMonster Browser is a desktop application compatible with macOS and Windows. Installing this application is essential to gain full access to the platform’s features, including the OnlyMonster interface and OnlyFans accounts. This article provides a detailed setup guide for installing the OnlyMonster browser on Windows and MacOS.
System Requirements
To ensure the optimal performance, your system should meet the following specifications:
8GB of RAM or more
Intel i5 processor (or equivalent)
5GB of free disk space
50Mbps internet connection
macOS 11.0 (Big Sur) or later, or 64-bit Windows 10 or later.
Step 1: Download the Browser
Visit the OnlyMonster website’s .
Download the appropriate installer for Windows.
Step 2: Locate the Download
Navigate to your Downloads folder.
Find the downloaded .exe file.
Step 3: Install the Browser
Double-click the .exe file.
Follow the on-screen prompts to complete the installation.
Step 4: Security Settings
If a security alert appears, click "Run Anyway"
Step 5: Check Firewall/Antivirus
Ensure that no firewall or antivirus software is blocking the app.
Step 6: Open the Browser
Double-click the OnlyMonster browser icon on your desktop to open it.
Step 1: Determine Your Chip Type and Download the Correct Version
Check whether your Mac uses an Intel or M1-M3 chip:
Click the Apple logo in the top left corner of your screen.
Select "About This Mac"
Under the Overview tab, look for the "Chip" or "Processor" entry to identify your chip type.
Step 2: Locate the Download
Navigate to your Downloads folder.
Find the downloaded .dmg file.
Step 3: Install the Browser
Double-click the .dmg file to open it.
Drag and drop the OnlyMonster browser into your Applications folder.
Step 4: Security Settings
If a security alert pops up saying the app can’t be opened:
Navigate to Apple Menu > System Preferences > Security & Privacy .
Under the General tab, click "Open Anyway" next to the message about the OnlyMonster browser.
Step 5: Check Firewall/Antivirus
Ensure that no firewall or antivirus software is blocking the app.
Step 6: Open the Browser
Double-click the OnlyMonster browser icon on your desktop to open it.
If the OnlyMonster Browser doesn’t run after installation, please refer to our for detailed instructions.
Dynamic Fan Lists is a new feature in OnlyMonster that lets you create smart fan segments using multiple filters. These lists can sync with OnlyFans collections, allowing you to use them in both native OnlyFans messaging and OnlyMonster Mass Messages.
Smart segmentation - Build fan lists based on subscription date, spending amount, and recent purchases (at both creator and agency level)
Automatic synchronization - Sync your lists with OnlyFans Collections for use outside of OnlyMonster.
Daily updates - Lists refresh automatically every 6 hours, eliminating the need for manual updates.
Navigate to the Dynamic Fan Lists section to view all lists created for individual creators within your agency.
The table displays:
List Name - Custom name assigned to each list
Applied Filters - Criteria used to segment fans
Fan Count - Total number of fans included in the list
Last Updated - Date and time of the last automatic refresh (lists refresh every 6 hours)
Click on any list to access detailed information about the fans , including:
Fan Name - Display name or ID (click to copy and navigate to the fan's account)
Total Spent - Fan's total spending on the creator's account
Last Purchase - Date of the fan's most recent purchase
Fan ID - OnlyFans identifier for the fan
Choose the model from the dropdown list for whom you want to create a fan list.
Enter a unique name for the list. Note that list names must be unique and cannot duplicate existing lists.
Select the filters you want to apply and enter the relevant values:
Available Filters:
Subscribed Within - Specify the number of days (e.g., fans who subscribed in the last 30 days)
Spent on Creator Between - Set minimum and maximum spending range on the creator's account. Both fields are required.
Spent on Agency Between - Set spending range across all accounts connected to your agency. Use this filter to identify fans who have spent on other creator profiles within your agency.
Purchased from Creator - Select fans based on recency of purchase from the specific creator:
Less than X days ago
More than X days ago
Purchased from Agency - Select fans based on recency of purchase from any creator in your agency:
Less than X days ago
More than X days ago
When creating a list, you can enable automatic export to OnlyFans. With this option enabled, the list will immediately sync to OnlyFans and become available in your collections.
If you don't enable auto-export during creation, you can manually export the list to OnlyFans at any time later.
To export a list manually:
Click the three dots in the list’s row
Select Export to OnlyFans
The list will be available in your OnlyFans Collections for messaging campaigns.
Use clear, descriptive list names that indicate the segmentation criteria
Combine multiple filters to create highly targeted fan segments
Enable auto-export for lists you plan to use frequently in OnlyFans native messaging
Lists automatically update every 6 hours based on your specified criteria
Sync with OnlyFans collections is optional and must be enabled during list creation or manually exported later
A team management system centralizes team oversight, allowing you to manage roles, access, and workflows efficiently, ensuring effective collaboration and team success.
Adding employees
For an employee to be added to the team, they first need to register on OnlyMonster platform.
During registration, they must select the "I am an Agency Employee" option and insert your unique invite link. After that, they will receive a confirmation email.
To share the unique invite link, navigate to the page, copy the link, and send it to the new employee.
Once your team members have successfully registered via your unique invite link, they will appear in your team members list.
must be assigned to the employee before they can access the Creator page.
With the ability to view the full list of your team members, as well as edit and delete accounts as necessary, you can efficiently manage your team's access and maintain control over your workspace.
You can view all your employees at once, as well as use filters or a search field:
Role filter - each employee is assigned a role with chosen permissions (for more details please refer to the );
Tags filter - you can add tags for additional team segmentation ();
Assigned creators filter: Sort the members by assigned Creators;
Search field: find members by their names or emails.
In the Team members list, you can view the following: 5. Check box - allows you to select multiple employees and assign them a role at once
6. Member’s ID: A unique ID of each user
7. Member’s name: Name that member specified when creating the account, or custom name if there is one
8. Assigned Сreators: All creators assigned to the member. You can assign and revoke Creators by clicking on the icons.
9. Member’s email.
10. Role assigned to a member. To each user's right, there are options to: 11. Edit 12. Remove the employee from the agency
Clicking the icons in the Assigned Creators column will open the assigning menu. Here you can specify which OnlyFans profiles the employee will have access to, provide access to all profiles, or revoke access.
Choose a creator from the dropdown menu and click "Assign Creator" to grant access. To revoke access, simply click "Revoke." Use the "Assign All" or "Revoke All" options to manage Member’s access for all creators at once.
By clicking "Edit" you'll be forwarded to the member’s configuration page, where you can:
Select a role from the dropdown menu, then click "Update" (for more details about roles, check the article).
You can specify which OnlyFans profiles the employee will have access to, provide access to all profiles, or revoke access. Select a creator from the dropdown menu and click "Assign Creator". To remove access, click "Revoke". You can simultaneously give or remove access to all creators by using "Assign All" or "Revoke All" options.
The ability to tag employees allows you to assign tags to specific employees, which simplifies editing and managing them later. To add a tag, select it from the dropdown menu or (if you need to create a new one type it in the field, then click "Add as New Tag"). After that, click "Update". To remove a tag, click the cross icon and then "Update".
To add a Custom name - enter the name and click "Update".
Message Tracker is a feature in OnlyMonster that lets you monitor your team's chatting activity in real-time. It provides a centralized view of all messages sent by your team members, enabling you to oversee conversations and quickly navigate to any chat when needed.
This centralized monitoring system significantly improves management efficiency by allowing you to track messaging activity across your agency from a single location.
Messages appear in the Message Tracker within seconds of being sent. Even with a high message volume, all messages are loaded quickly and simultaneously, ensuring smooth real-time tracking.
Messages in the Message Tracker are stored for 3 months from the date they were sent. This allows managers to review past conversations and verify team interactions whenever necessary.
The Message Tracker provides a detailed, real-time view of all messages sent by your team. It displays message data in a comprehensive table view, with built-in filters and precise information for each message.
You can filter messages using the following parameters:
Creator - View messages sent from specific creator accounts
Sender- Filter messages by the team member who sent them
Time Range - The time range filter allows you to select the period for which you want to view messages
Price - Filter by message type based on paid status:
The Message Tracker displays the following information:
Message - The content of the sent message. If the message text is too long to display, hover over it to view the full text. Note: media previews are not currently supported.
Sender - The name of the team member who sent the message.
Creator - The creator account from which the message was sent.
Fan - The fan's ID displayed with a clickable link. Clicking the ID copies the fan's profile link to your clipboard. To open the chat with the fan, navigate to the OnlyFans profile and paste the copied link into a new tab.
Send Date - The date and time the message was sent, displayed in the user’s local time zone.
Reply Time - The time elapsed since the fan's previous message. If more than 1 hour has passed, this field remains empty, as this indicates the start of a new conversation.
Input Method - The method used to send the message. Available options include:
Manual - messages typed manually by chatters
Copy-pasted - messages sent using copy and paste
AI - messages generated using AI Assistant
Template - messages sent from saved templates
Price - The price of the sent message (if applicable).
Purchased - Indicates whether the message was purchased by the fan.
Access to the Message Tracker is controlled through permissions.
Team members must have the Message Tracker permission enabled in their role settings to view and use this feature.
Some users manage multiple agencies and need to work in two OnlyMonster instances at the same time. This guide shows how to open two independent windows of the OnlyMonster Browser on the same device, each logged into a separate account, making it easy to switch between agencies without logging in and out.
Follow these steps to create a second, independent instance of OnlyMonster Browser:
1. Locate the OnlyMonster Browser shortcut on your desktop.
2. Right-click the shortcut → Copy, then right-click an empty area on your desktop → Paste to create a duplicate.
3. Configure the new shortcut:
Right-click on the newly created shortcut and select Properties.
In the Target field, delete the existing text and paste the following path: "C:\Program Files\OnlyMonsterBrowser\OnlyMonsterBrowser.exe" --user-data-dir="C:\Profiles\OnlyMonsterBrowser\account1"
Click Apply, then OK to save.
After completing the setup:
Opening this shortcut will launch a completely separate browser window, isolated from your original session.
On the first launch, you'll need to log in manually to your second account.
Future launches will open the browser automatically logged in, using the saved credentials for that account.
Unique profile paths: Make sure each profile has a unique user-data-dir path. For example:
account1 for the first additional profile
account2 for another profile, and so on
System performance: Running two or more instances may increase memory and CPU usage. Only open multiple accounts if you're confident your device can handle the additional load.
Restoring the original shortcut: If you accidentally delete the original shortcut, you can recreate it by following steps 3-4 above and using this path:
"C:\Program Files\OnlyMonsterBrowser\OnlyMonsterBrowser.exe"
Shortcut stops working: If your second shortcut stops functioning, delete it and repeat the setup steps from the beginning.
Step 1. Open Terminal.
You can find it via Launchpad → Other → Terminal, or by searching “Terminal” in Spotlight (⌘ + Space).
Step 2. Run the first instance. Paste the following command into Terminal and press Enter:
Step 3. Run additional instances. Open a new Terminal tab and use a similar command with a different profile name:
You can repeat this process for as many independent windows as you need (Profile 3, Profile 4, etc.).
Important: Do not close the Terminal window after launching OnlyMonster, or the browser will close.
Each profile creates a separate, independent browser environment.
Use unique folder and profile names for each instance. (e.g., OnlyMonsterProfile1, OnlyMonsterProfile2).
The first time you open a new profile, you’ll need to log in manually. Credentials will be saved for next time.
Like on Windows, multiple instances may use more system resources (RAM/CPU).
OnlyMonster is a powerful tool for managing creators, agencies and teams working across multiple fan platforms. Below is a list of all currently supported platforms and the features available for each.
We’re continuously expanding our integrations to help you manage all your operations from a single place.
OnlyFans is the leading subscription-based fan platform for creators of all kinds. It's the most deeply integrated with OnlyMonster, offering the widest range of tools and automations.
Available features:
Traffic Metrics V2.0 introduces advanced cost attribution and profitability analysis for your traffic campaigns. This guide explains the available metrics, the supported cost attribution models, and how to configure them to accurately measure campaign performance.
Understanding both your acquisition costs and revenue metrics is essential for evaluating traffic partnerships and optimising campaigns. OnlyMonster’s Traffic Metrics provide flexible attribution options that support a variety of payment models — from fixed budgets to performance-based structures.
The Traffic Metrics dashboard displays two main types of data:
The Creator Insights dashboard delivers a comprehensive view of performance for both individual creators and your agency as a whole. Use this analytics to identify trends, track progress and make pre
This feature detects prohibited language in real time, warning chatters before they send a message that contains restricted words, and allows managers to monitor such attempts.
Following platform rules is crucial for keeping your OnlyFans account active and avoiding potential blocks. A key part of this is using appropriate language in messages and posts. The platform can automatically block accounts for using certain words and phrases that violate its terms and conditions. To help prevent this, OnlyMonster offers the Restricted Words feature, that identifies and blocks banned words automatically.
On OnlyFans, the Restricted Words feature does not always block messages automatically. If a word is on the platform's strict ban list, the message cannot be sent at all. However, for less restricted words, the message may still be delivered and appear in the chat before being manually reviewed by moderators. This can lead to several issues:
Proxy settings are crucial for ensuring seamless and secure operations for agencies and creators. One of the first steps when working with a creator is to choose the most suitable proxies.
The Real-Time Alerts feature allows you to receive real-time alerts when your fans come online. This helps you engage with them quickly, providing timely and personalized interactions.
By enabling these notifications, you can prioritize your time and focus on the fans who are active, ensuring that you make the most of your opportunities for communication and connection.
Currently, we provide alerts for every fan coming online, but you can easily disable this feature.
Additionally, you can enable notifications for specific fans of your choosing for a more personalized experience.
Performance Data — raw numbers representing clicks, fans, and revenue.
Efficiency Metrics — calculated indicators showing profitability and cost-effectiveness..
Clicks — Total number of clicks (available for Tracking Links and Trial Links). This metric indicates initial campaign engagement and is the starting point for conversion analysis.
Fans — Number of users acquired through traffic links and direct traffic. This represents successful conversions across all traffic sources.
Spenders – Number of unique fans who have made at least one payment.
Cost — Total campaign spend. This value can be either entered manually or calculated automatically based on your attribution settings. This figure impacts all profitability calculations.
Earnings — Revenue generated from acquired fans during the selected date range. Earnings attribution depends on your filter settings and the attribution model selected in the main Traffic Metrics settings.
Profit — Net profit (Earnings minus Cost). This is your primary profitability indicator.
CPC (Cost Per Click) — Average cost per click (Cost ÷ Clicks). Helps you compare the efficiency of different traffic sources at the acquisition stage. Available for Tracking Links and Trial Links. Can be either entered manually or calculated automatically based on your attribution settings.
CPF (Cost Per Fan) — Average acquisition cost per fan (Cost ÷ Fans). Shows how much you spend to acquire one fan. Can be either entered manually or calculated automatically based on your attribution settings.
EPC (Earnings Per Click) — Average revenue per click (Earnings ÷ Clicks). Shows the revenue value of your traffic at the click level. Available for Tracking Links and Trial Links. Can be either entered manually or calculated automatically based on your attribution settings.
ARPF (Average Revenue Per Fan) — Average revenue generated per fan (Earnings ÷ Fans). Helps you understand the value of fans from different traffic sources.
Conversion Rate — Percentage of clicks that convert to fans (Fans ÷ Clicks × 100). Shows how effectively your fan traffic converts to subscriptions. Available for Tracking Links and Trial Links.
CPE (Cost Per Earning) — Cost required to generate one dollar of revenue (Cost ÷ Earnings). Lower values indicate more efficient spending relative to revenue generated.
Revenue Share — Percentage of earnings allocated to your traffic partner. Available for all traffic types. When entered, the system calculates Cost as (Earnings × Revenue Share %).
ROI (Return on Investment) — (Profit ÷ Cost) × 100. Shows the overall profitability of your campaign. Positive ROI indicates profitable campaigns, negative ROI signals losses.
OnlyMonster supports two cost attribution models: Fixed Cost and Dynamic Cost. Choose the model that matches the way you pay your traffic partners.
With Fixed Cost Attribution, you manually enter your campaign costs in the Cost column. The system uses this value to calculate all profitability metrics, including Profit, CPC, CPF, CPE, and ROI.
Use this method when you have:
Fixed budgets
Flat monthly fees
Contracts with predetermined pricing
A preference for manually controlling cost values.
Dynamic attribution automatically calculates Cost based on your payment model. After selecting a model and entering a rate, the system calculates the Cost using real campaign performance.
Available for Tracking Links and Trial Links. The system calculates Cost as: Clicks × CPC Rate.
This automatically updates:
Cost
Profit
CPF
CPE
ROI
Use CPC when partners charge per click.
Available for all traffic types. The system calculates Cost as: Fans × CPF Rate.
This automatically updates:
Cost
Profit
CPC
CPE
ROI
Use CPF when partners charge per acquired fan.
Available for all traffic types. The system calculates Cost as: Earnings × Revenue Share %.
This automatically updates:
Cost
Profit
CPC
CPF
CPE
ROI
Use Revenue Share for affiliate or performance-based partnerships.
Fixed Cost — Use for fixed-fee or budget-based campaigns
CPC — Use when partners charge for each click
CPF — Use when partners charge for each acquired fan
Revenue Share — Use when partners earn a percentage of your revenue
To keep the interface clear, the system displays metrics based on available data:
“N/A” appears when required data (Clicks or Fans) is missing
“–” appears when calculations are impossible (for example, when Clicks, Fans, or Earnings are equal to zero)
Empty input fields indicate that the value can be manually edited (Cost, CPC, CPF)
To change cost attribution settings, your role must include the Edit Traffic Metrics permission.
List OF Sync - Date when the list was last synchronized with OnlyFans collections
Date Added - When the fan was added to the list
Chat Link - Direct link to the conversation with the fan (click to copy and open chat)


All — all messages
Paid — paid messages
Free — free messages
Reply Time - Filter by message response time


"/Applications/OnlyMonsterBrowser.app/Contents/MacOS/OnlyMonsterBrowser" \
--user-data-dir="$HOME/OnlyMonsterProfile1" --profile-directory="Profile 1""/Applications/OnlyMonsterBrowser.app/Contents/MacOS/OnlyMonsterBrowser" \
--user-data-dir="$HOME/OnlyMonsterProfile2" --profile-directory="Profile 2"Visit the OnlyMonster website’s Download page .
Download the macOS installer that matches your chip type (Intel or M1-M3).
Multiple groups cannot be selected at once.
Allows selection of specific creators (one or multiple creators simultaneously). The default state is “All creators”.
Clear Button: Clears all selected creators in the field.
Allows filtering by a specific role. When selecting a role, all members with the selected role will be displayed in the Chatter filter automatically.
Multiple roles cannot be selected at once.
Allows selection of specific chatters (one or multiple simultaneously) to display statistics for those chatters only. The default state is “All chatters”.
Clear Button: Clears all selected chatters in the field.
Exact Time Selection: Select the main time range and specific times in the AM and PM for precise data analysis.
OF Time Zone: By default, the checkbox is selected, and all statistics are displayed in UTC+0 timezone, when unselected — statistics are shown in your agency's timezone.
Display the statistics in Gross or Net.
Member: Displays the name and ID of the chatter whose metrics are shown.
Creators: Creator that chatter worked with and for whom metrics are displayed.
Total sales: Total revenue generated by the chatter, including PPV sales and tips. Indicates the chatter’s overall contribution to revenue.
PPV Sales: Total revenue generated from PPV messages. Indicates the chatter's contribution to sales via selling PPV.
Tips: Total revenue generated from tips. Indicates the chatter’s contribution to sales via tips.
Impact: Percentage of the chatter’s PPV sales relative to total PPV sales. Assesses the individual’s share in overall paid message revenue.
Total Messages Sent: Total amount of messages sent by the chatter, excluding Mass Messages. Measures overall messaging activity.
Manually Typed Messages: Amount of manually written and sent messages, excluding AI Replies, Templates, and Mass Messages. Highlights personal interaction.
AI Replies: Number of messages generated and sent using AI. Indicates the usage of AI by the chatter.
Templates Sent: Total messages sent using created Templates. Indicates the usage of Templates by the chatter.
Copy-Paste Count: Amount of messages sent via copy-paste.
Unsent Messages: Amount of messages unsent by the chatter. Clicking on the figure allows viewing the list of unsent messages, with a direct chat link provided.
Free Media Sent: Amount of messages sent with only free media. Tracks non-monetized media sharing.
PPV Sent: Amount of messages sent with paid media content. Displays how often the chatter initiates a sale.
PPV Sold: Amount of PPV messages purchased by fans. Indicates successful paid content sales.
Avg. PPV Purchase Time: Average time taken for a message to be purchased after being sent (within 60 minutes). Displays the fan's level of willingness to make a purchase.
PPV to Free Ratio: Ratio of messages sent with free media to messages with paid media. Displays how often the chatter initiates a sale compared to sending media for free.
PPV to Message Ratio: Ratio of paid media messages to the total number of messages sent. Indicates the focus on making sales.
PPV Open Rate: Percentage of PPV messages purchased out of all sent PPV messages. Shows how often fans make a purchase of a PPV message sent by a chatter.
Avg. Price of Sent PPV: Average price of sent PPV messages in gross terms. Provides pricing strategy insights.
Avg. Price of Sold PPV: Average price of purchased PPV messages in gross. Analyzes revenue per sale.
Total Chats: Number of unique chats where manually typed messages were sent. Displays how many chats the chatter has processed manually.
Words: Total count of words written and sent by the chatter. Indicates communication volume.
Avg. Words per Message: Average word count in manually typed messages. Reflects detail level in interactions.
Posts: Number of posts created by the chatter. Demonstrates content contribution.
Click any column header to sort members in ascending or descending order.
Use the Columns button to hide, display, or reorder columns by dragging and dropping. The Reset button will restore all columns to their default order.
You can export Chatter Metrics data in XLSX and CSV formats by clicking the Export button. After selecting your preferred format, the download will begin automatically.
This section allows you to view all member transactions and assign or reassign transactions that were not automatically attributed or were assigned to the wrong member.
The Chatter Metrics board accounts for two types of transactions: manually sent PPVs and tips.
PPV: If a fan purchases a PPV more than 7 days after it was sent, it will not be automatically assigned.
Tips: If a tip is received more than an hour after the last message was sent, it won’t be credited in Chatter Metrics. Additionally, if another member sends a message in the chat, the tip will be assigned to them (to the most recent message before the tip).
In such cases, transactions may need to be reassigned. Once reassigned, Chatter Metrics statistics will be updated within a few minutes.
The Time Range and Filters in this section work the same as those in the Chatter Metrics Overview board, with the addition of a Status filter, which provides three filtering options:
• Completed: Successful transactions.
• Refunded: Transactions that were charged back.
• All: Includes both completed and refunded transactions.
The section displays key transaction details:
• Date: The date of the transaction.
• Creator: The creator associated with the transaction.
• Net: The net amount of the transaction.
• Transaction Type: PPV or tips.
• Assignee: The chatter assigned to the transaction. Transactions can be reassigned by clicking on the assigned value.
• Assigned By: Specifies whether the transaction was assigned automatically or manually by an agency member.
• Status: Indicates whether the transaction is Completed or Refunded.
There are three levels of permissions for Chatter Metrics and Transactions:
1. View Metrics: Access to the Chatter Metrics dashboard.
2. View Transactions: Access to Transactions tab without the ability to make changes. This permission automatically includes View Metrics permissions.
3. Edit Transactions: Enables assigning transactions to agency members. Enables both View Metrics and View Transactions permissions.
Proxy support
Assigning profiles to team members
Advanced metrics and analytics
Automation tools
AI Assistant
Lists and tagging
Notification and messages counter
Desktop push notifications
Spell checker and much more.
If you use OnlyFans, you get access to the full power of the OnlyMonster ecosystem.
Fansly is a fast-growing content subscription platform with advanced monetization tools. OnlyMonster offers robust workflow and team management features for Fansly.
Available features:
Proxy support
Assigning profiles
Fan's Overview widget
Desktop push notifications
Notification and messages counter
Spell checker
Shift-Based Access
Content blur
Chat translator
Fanvue is a rising fan subscription platform focused on creators and athletes. OnlyMonster currently supports essential team operations for this platform.
Available features:
Proxy support
Assigning profiles
Shift-Based Access
Notification and messages counter
Desktop push messages notifications
Content blur
MYM (Meet Your Model) is a popular European fan platform focused on visual content. OnlyMonster supports streamlined team management for MYM profiles.
Available features:
Proxy support
Assigning profiles
Shift-Based Access
Reddit is widely used for fan engagement and promotion. OnlyMonster helps organize team workflows and permissions on Reddit accounts.
Available features:
Proxy support
Assigning profiles
Shift-Based Access
Content blur
LoyalFans is a fan platform that combines live streaming, messaging, and content subscriptions. OnlyMonster supports basic tools for team-based account management.
Available features:
Proxy support
Assigning profiles
Shift-Based Access
Subs is an emerging platform focused on creator-friendly policies and flexible pricing. OnlyMonster supports basic workflow tools for agencies using Subs.
Available features:
Proxy support
Assigning profiles
Shift-Based Access
Telegram is a popular tool for fan communication, content distribution, and internal team coordination. OnlyMonster helps structure these workflows effectively.
Available features:
Proxy support
Assigning profiles
Shift-based Access
Fan's Overview widget
Messages counter
Desktop push notifications
Content blur
Chat translator
This allows you to distribute work efficiently and maintain full visibility over team actions.
We are continuously working to expand platform functionality and offer deeper integrations. Stay tuned for updates.
Time Range and Time Zone – Choose any reporting period and adjust to your agency's preferred timezone. By default, OF Time Zone (UTC 0) is selected. To use your agency's custom timezone, uncheck the box and adjust the setting in your Agency Settings. .
Earning Type Filter – Toggle between Net (after platform fees) and Gross earnings (before fees) for flexible reporting.
Synchronization Date – Displays the most recent date when the data was last synchronized and updated.
Total Earnings – The total revenue generated in the selected time period.
Total Purchases – The total number of completed fan transactions.
Spenders – The number of unique fans who made at least one purchase. .
Average Earnings per Fan – Calculated by dividing Total Earnings by the number of Spenders — this shows the average amount each purchasing fan spent during the selected time frame. .
Earnings Chart – Get a full breakdown of your earnings by category:
Subscriptions
Recurring Subscriptions
Tips
Posts
Messages
Streams
Use this chart to track revenue trends over time and identify which monetization streams perform best.
Best Day – Find out which day of the week brings in the highest average earnings within your selected period. You can filter by revenue type:
Subscriptions
Recurring Subscriptions
Tips
Posts
Messages
Streams
Best Hour – Discover the hour of the day when your fans are most active and most likely to spend.This metric shows average earnings per hour for the selected timeframe and is filterable by revenue type. Use this to optimize chatter schedules and campaign timing. .
Day/Hour Earnings Heatmap – A powerful visual tool to spot your most profitable time slots across the week.Each cell shows the average earnings for a specific day and hour. The lighter the cell, the higher the revenue.
You can filter by:
All revenue types
Subscriptions
Recurring subscriptions
Tips
Posts
Messages
Streams
Pro tip: Use the heatmap to time content drops, chats, and campaigns when fans are most likely to spend.
New Fans (single-creator view only) – Track acquisition trends over time.
Includes:
Paid and free regular subscriptions
Returning fans who previously unsubscribed and came back
Excludes trials, promos, and bundle-based signups — so you see real organic growth.
Quickly see how your revenue is distributed across different income streams. Data is visualized in a pie chart to show each type’s percentage share of your total revenue.
Subscriptions
Tips
Posts
Messages
Streams
Other earnings
Recurring subscriptions
Displays:
Total number of chargebacks
Total value of chargebacks
Chargebacks are shown by the original transaction date, not the date the chargeback occurred — giving you accurate timeline context.
Top Spending Fans – Get a clear view of your highest-value fans — sorted by total amount spent.
For each fan, you’ll see:
Number of purchases
Last purchase date
Average spend
Max spend
Total spend
Export Option – Download the top spending fans list in Excel or CSV format for internal analysis or reporting.
Creator Insights is built on OnlyFans data and goes several layers deeper — giving you flexible charts, peak activity analytics, and a clear earnings breakdown. . This tool helps you evaluate performance from multiple angles and identify opportunities for growth.
The enhanced dashboard provides an intuitive way to track key metrics across your agency. To get the most out of it:
Track results weekly or monthly
Compare creators or campaigns
Use the data to tweak strategy, timing, and fan engagement.
This helps optimize processes, improve performance, and achieve better outcomes.

Chatters may unknowingly continue the conversation, being unaware that a message could later trigger sanctions.
If Platform moderators determine that the word violates platform rules, the account may get a warning or even be banned.
The account owner does not receive prior warnings, increasing the risk of unexpected penalties.
If OnlyFans protection is triggered, a message pops up, but it does not specify which word is a restricted one. This makes it difficult to identify the prohibited word. OnlyMonster, however, highlights the restricted word, making it easy to identify and address before continuing the conversation.
One significant drawback of OnlyFans’ built-in protection is the lack of logs for blocked message attempts. This makes it difficult to track and understand which messages triggered the restriction.
The Restricted Words feature in OnlyMonster is more reliable and customizable:
Restricted words are fully blocked — messages containing them cannot be sent by chatters. Agencies can customize their restricted word list, adding new words to align with their strategy. A log of blocked message attempts is available, allowing you to see which chatter tried to use a restricted word.
The Restricted Words feature is designed to:
Automatically filter out banned words and phrases to ensure compliance with platform rules.
Enable custom word lists for more precise filtering.
Prevent account blocks by alerting team members to potential violations before messages are sent.
Track attempts by team members to use banned words.
Enable the feature:
Log in to your OnlyMonster account, open the Control Panel. Navigate to the Restricted Words tab and activate the Protection Status option.
Use the preset list:
By default, the system includes a list of over 150 banned words that violate OnlyFans rules. This list will be automatically applied when protected status is enabled.
Add custom restricted words:
You can add specific words or phrases to the banned list to suit your needs. When adding custom words, you can also block parts of a word by using the asterisk (*) symbol. To block a word and its variations, add both the root word and derivatives.
Additional protection:
This feature also includes AI-powered detection that can help identify unwanted addresses or links. It provides additional protection by allowing you to block websites, email addresses, phone numbers, and crypto wallet details.
Save your changes:
After customizing your list, click Update to apply the changes.
Once the Restricted Words feature is activated, the system automatically checks all your messages, including private messages, OF mass messages, and OM priority messages. If any banned words are detected, they will be highlighted before the message is sent, allowing you to remove or replace them.
Managers with access to the Restricted Words tab can view the Restricted Words Log, which tracks the following details:
The creator linked to the restricted word.
The chatter who attempted to use the word.
A link to the chat where the word was used.
The type of message sent.
The restricted word itself.
The full message containing the banned word.
The date the message was sent.
View Restricted Words: Permission to view Restricted Words tab in OnlyMonster Panel.
Edit Restricted Words: Allows for adding and editing Restricted Words Settings.
For agencies that have numerous employees at different levels, it’s crucial to ensure all team members are using a single IP address that is securely protected and assigned to the account.
After activating a subscription plan, you need to enable a proxy when adding a new profile to the agency. The subscription plan includes proxies from a primary provider, so there is no need to purchase them separately.
To set a proxy:
Go to the Creator’s tab.
Open Settings.
Scroll down to the Proxy Settings section.
We understand how important proxy settings are, which is why we offer several options for our customers. This allows each agency to select the best option for their needs:
Primary Provider proxy is recommended by OnlyMonster proxy setup.
Three options are available: Germany, Singapore, or the USA. The decision should be based on the location of the team working on the account.
Team’s location - recommended region:
Europe - Germany
Central and South Asia - Singapore
For other regions, the best option is the USA.
What are the advantages of primary proxies we suggest using? These are unique and stable proxies, allowing you to change IP up to 10 times a day. They are provided by one of the most reliable vendors on the market.
If it’s necessary to use your agency’s custom proxies, our system also supports SOCKS5 proxies. To set this up:
Open Settings.
Fill in the required fields.
Click Save (1).
Once saved, you can select and activate the proxy (2).
Several factors can cause loading issues. To determine whether the issue is related to proxy performance, follow the next simple steps.
Perform two speed tests:
One in your regular browser.
One in a separate tab from the creator’s profile.
Click on the creator’s icon and open a new tab for the test. If the regular browser's speed test shows over 50 Mbps, but the creator’s tab has significantly lower results, switching the IP or proxy may be necessary.
To do this:
Go to the Creators tab.
Open Settings.
Click Switch IP to change to another proxy without changing the country.
Reload the browser.
If the issue persists, please contact support.
For more information on adding and managing creators, please refer to the article Creator Management.


Media Hub is a cloud-based storage solution that allows users to upload and manage media files, link folders to other accounts, and easily upload content to various platforms.
Speed: Simplified uploading and file management save you time.
Security: Files are securely protected with role-based access (RBA).
Integration: Compatibility with OnlyFans ensures fast and seamless access to your content. Soon, Media Hub will be integrated with Fansly.
You can upload photo, video, audio files, and gifs directly to OnlyMonster’s storage system. All files can be organized into convenient folders. Once uploaded, the files automatically appear in the Media Box, eliminating the need to manually upload them to the platform.
Click on Create Folder.
Enter a name for the folder.
Once the folder is created, you can start uploading content.
To upload content, click Upload Media, add files from the selected directory, or drag and drop them into the marked area.
After uploading, verify that all files are marked as Complete.
You can upload additional files to any existing folder.
If you re-upload content that was previously exported to the OnlyFans Vault, they may not automatically appear in the Vault again after export.
Linking a model to a folder allows you to duplicate the contents of this folder across multiple Creator’s profiles.
If you delete a folder linked to a model, it will be removed from all linked accounts at once.
Use linking carefully when managing shared media across multiple creators.
The Auto Export feature allows you to send Media Hub content directly to the OnlyFans Vault. The media file is sent to the chat with the connected fan and immediately deleted from the chat; the fan will not see the sent content.
Link the folder to an OnlyFans profile that has an active chat option.
Auto-export starts automatically once linked.
After a successful export, the OF icon will appear on the file.
If export fails, verify:
The fan’s chat is open and available.
You have permission to send messages to the fan.
The feature allows you to edit media files in bulk or individually.
Select multiple files using the checkboxes.
Click Edit to:
Add or update tags.
Set recommended prices.
Delete files.
Clear existing information (tags, prices, descriptions).
Click the file settings icon to open the Media File Details window.
You can edit:
Tags
Description
Recommended Price
Deleting from Media Hub: removes the file from storage but keeps it in the OnlyFans Vault (if it was previously exported).
Deleting from OnlyFans: must be done manually inside the OnlyFans Vault.
Re-upload after deletion:
Files deleted from the OnlyFans Vault cannot be re-exported automatically.
To re-export, you must update the file’s metadata before uploading again.
Send files directly to subscribers via chat from the Media Box. You can send up to 40 files at a time, adhering to the OnlyFans platform's maximum limit.
When viewing videos from the Media Hub accessed via the OnlyFans page, videos can only be played in a small window without the option to fast-forward.
To fast-forward videos in the Media Hub through OnlyMonster:
Open the video in the Media Hub interface.
Click on the play button and drag the progress bar at the bottom to the desired point.
Adjust playback as needed.
Supported Formats: .jpeg, .jpg, image/jpeg, image/pjpeg, .gif, image/gif, .png, image/png, image/x-png, .mp3, audio/mp3, .wav, audio/wav, .ogg, audio/ogg, .mp4, audio/mp4, video/mp4, .mov, .moov, video/quicktime, .m4v, .mpeg, .mpg, video/mpeg, .wmv, video/x-ms-wmv, .avi, video/avi, video/msvideo, video/x-msvideo, .webm, .mkv, video/x-matroska
Videos: Up to 4 GB
Images: Up to 10,000 x 10,000 pixels
Audio: Up to 300 MB
OnlyFans Selection Limits: You can select up to 40 files at a time (due to OnlyFans restrictions).
The permissions allow for setting different levels of access to manage media in Media Hub in the OnlyMonster browser.
View Media: Allows working with Media Hub files in the OnlyMonster Browser panel. Provides access to view the quality of files stored in the Media Hub. Enables the use of media in the chat toolbar (free and paid messages), scripts, follow-up, and scheduled messages.
Upload Media: Allows uploading media to the Media Hub panel using the “Upload Media” button.
Edit Media: Allows the users to:
All users of Media Hub must agree to our terms of service and have explicit permission from the content creator before uploading or sharing any content.
We log all user actions, including uploads and downloads, along with details such as IP addresses. If prohibited content (as defined by OnlyMonster, OnlyFans, or any other fan platform) is uploaded, this information will be reported to law enforcement.
To prevent leaks, Media Hub does not allow full-screen viewing of uploaded content.
With Media Hub, you no longer need to worry about re-uploading files to OnlyFans. All actions—from editing to sending—are performed within one system, greatly streamlining your workflow. Plus, bulk editing features let you handle multiple files simultaneously, saving precious time.
This feature is designed to simplify work scheduling.
A new Shift can be created by clicking the Create New Shift button or by selecting a time slot directly in the Calendar.
Steps to Create a New Shift using the Calendar:
Select a Time Slot:
In the Month view, click on the appropriate day.
In the Week or Day Views, swipe to select the time slot for the Shift.
Fill out the next fields in the Window opened:
If multiple Chatter Shifts are scheduled for the same time frame, a notification will appear.
Click on the notification to view detailed information about the overlapping shifts and access options to edit them as needed.
To access the Edit Menu, click on the Shift you want to modify.
There are two modes of change available — editing individual Shift or the entire Shift sequence.
Choose the type of change to be made. After that, an Edit Menu Window will appear.
All the necessary changes to the Shift settings
Changing the time frame:
To change the time frame, simply drag the Shift up or down. Shifts can only be moved within 24 hours of the day, and cannot be rescheduled to a time after midnight.
For each Shift the following information is shown on all views:
Shift title, Shift hours, duration, assigned members (names), and assigned creators (icons).
All the Visible Shifts are displayed in the Calendar, with 4 Views available:
Month: all scheduled Shifts within a month.
Week: Monday to Sunday daily display.
Day: all Shifts within a specific day. In the Week and Day Views, the Shifts can be dragged and adjusted within a day.
Schedule: a chronological list of all Shifts.
The “Today” button instantly rolls over to today's date.
Shifts can be hidden and made visible back as needed. A Hidden Shift is not displayed in the Views but remains accessible with the “Hidden” knob and the “Hidden” toggle.
Only members with the “Edit” permission can hide Shifts. Employees without the permission “Edit” will not be able to access Hidden Shifts.
If necessary, a Shift can be extended by 15 minutes. To do this, hover over the Shift and click on +15 minutes. The next Shift start (same creator or group of creators) will be automatically moved by 15 minutes. If the next shift does not have the same creator or group of creators, then only the current shift will be extended by 15 minutes.
The Shift can be extended only once.
Filter Form and Header Information
Filters: Chatter Shifts can be filtered by Creator Groups, Individual Creators, or Chatters.
If no filters are applied, Shifts for all creators and chatters of the agency are displayed.
The “Hidden” toggle: Switches between two display modes — Visible Shifts only, or Visible and Hidden Shifts.
The “Hidden” knob: Pops up a list of all “Hidden Shifts”, allowing you to change them to “Visible shifts”. Visible Shifts are displayed again in Chatter Shifts Views.
For extra convenience, the panel displays both UTC+0 time and your agency’s local time.
OnlyMonster permission system provides two operation levels:
View Mode: optimal for operators; provides access to viewing shifts without the right to make changes. Can only extend their own Shift once a day.
Edit Mode: optimal for managers; allows for enabling the creation and edition of shifts. Can extend any Shift within the current 24 hours.
If you have any questions or suggestions — feel free to contact us. We will greatly appreciate your feedback and suggestions for improvements.
Roles & Permissions allow the agency owner to decide what features each team member can access and use on the OnlyMonster platform and the connected OnlyFans profiles.
Some team members may only need to chat with fans, while others may require full access to manage the agency’s business operations.
In this doc, we will explain how to configure employee access using the roles’ system to ensure security and efficient operation.
Role must be assigned to the employee before they can access the Creator page.
Role’s system is a flexible access feature that allows you to control what your agency's employees can do. For each role, you can select specific permissions and save them. In this way, you create a pre-set of permissions that you can assign to your employees.
Thus, you don’t need to set up access for each new employee individually. Instead, you have to create the role and choose the permissions once.
Navigate to the 'Roles' tab. Here you can add a new role, edit it, or delete it if necessary.
Click 'Add New Role'
Name the role according to its intended function.
Choose a color for the role label.
Assign permissions to the role based on what access you want the users to have.
After you choose the permissions - click “Create”.
Done. The role is created.
You can edit and delete roles in the Roles tab.
To change access settings for your employees, click "Edit". Now you’ve been forwarded to the Permissions section, where you can remove current permissions and grant new ones. After making the necessary changes, click "Save".
The role will be updated within 5 minutes, and all employees with that role will get the new access permissions.
To delete a role, click "Delete".
When a role assigned to a specific employee is deleted, the employee will be assigned the "Default Member" role. In this case, they will get access to the OnlyFans profiles and platform functionality. If you need to revoke all permissions for an employee, you can create a role with no permissions and assign it to employees as needed.
The Permissions section contains all available permissions, which are divided into 4 blocks:
OnlyFans Menu - You can choose to either open or keep closed each section in the OnlyFans menu to ensure the security of your team’s operations.
OnlyFans Chatting & Security - This block contains permissions related to the security of your agency.
Permission to Unsend messages allows a user to unsend a message within 24 hours. When disabled all users can unsend a message within 1 minute.
OnlyMonster Control Panel - Section access configurations for the OnlyMonster platform are crucial for managers and team leads, giving them access to analytics and management tools.
OnlyFans Enhancements - Additional tools to enhance the chatting experience and fans’ interaction.
To grant permission, tick the corresponding checkbox. When all permissions are chosen - click on Save.
These permissions are crucial for the account’s safety and they should not be given to all team members:
Settings
Streaming
Help & Support
Recommendations for creating roles for both beginner and experienced chatters, as well as managers. These permission settings are recommended and can be used as a starting point for your work with OnlyMonster. You can select permissions based on your agency's policy and personal preferences.
Once you’ve created a role, you can assign it to employees in your agency.
Go to the .
Click on edit member.
Select the role from the dropdown list.
This powerful tool simplifies the process of organizing your fans, including expired ones, saving you time and effort.
No more boring manual fan sorting! Easily create filters based on various criteria such as spending amount, fan's rebilling settings, subscription duration, and more. Stay tuned for even more filters to be added soon.
At the moment, you can quickly refresh the list by clicking the refresh button.
Maximize the use of List Labels by assigning each list a unique emoji. This helps you rapidly identify fans from a specific list in your chat inbox, streamlining your fan management process. Simply add a new label and close the window.
The Follow-Up Message feature allows you to schedule smart, delayed messages, optimizing communication with fans while keeping their engagement high.
This tool helps streamline personal conversations by enabling flexible scheduling and cancelation conditions, ensuring natural and engaging interactions.
Custom Timer: Schedule messages to be sent up to 120 minutes later.
Cancelation Settings: Automatically cancel message delivery if a fan sends a message before the timer expires, keeping conversations natural and responsive.
Versatile Messaging: Schedule text messages, media files, and pay-per-view (PPV) content.
Automatic Cancellation Option: If a message is received or sent in the chat before the scheduled message is sent, it will be automatically canceled. This helps maintain a natural flow of conversation and prevents redundancy.
Ease of Use: Scheduled messages are displayed directly within the chat with the fan, rather than in a separate window, ensuring a seamless and user-friendly experience.
1. Compose Your Message: Type your message in the message field and attach media files and set the price, if needed.
2. Access the Follow-Up Menu: Open the Follow-Up settings.
3. Set a Timer: Choose a preset time or set a custom delay (up to 120 minutes).
4. Define Cancelation Options:
Cancel if the fan sends a message before the timer expires.
Cancel if you send another message before the scheduled one.
To ensure the message is sent regardless of fan or creator activity, uncheck the cancelation settings.
5. Confirm Scheduling: After setting the timer and cancelation options, the message enters pending status and will be sent automatically unless the cancelation conditions are triggered.
You can check and manage scheduled messages by navigating to the “You have № Follow-Up message(s)” section. From there, you can:
1. Monitor Delivery Time: Check how much time remains before the message is sent.
2. Delete Messages: Cancel delivery by deleting the scheduled message.
3. Send Immediately: Manually send the message right away.
The Follow-Up Message feature provides flexibility and control, helping you maintain engaging and thoughtful interactions with fans while optimizing your workflow.
Optimizing fan engagement is a key aspect of any OnlyFans creator's success. Our priority mass messages feature is an innovative tool that helps you achieve this. Unlike the standard mass message methods that often get your messages lost in the spam list, our feature ensures your messages land directly in your fans' priority list. To take this one step further, we've integrated an AI assistant into this feature. It aims to help you create engaging templates for your messages, giving you a solid starting point for crafting that perfect message.
When you're composing your priority mass messages, our AI assistant will suggest a template. It's not a finished product, but more like a brainstorming partner giving you some ideas to get your creative juices flowing.
Remember, these AI buttons are a base for you to build upon. They're meant to be customized according to your specific audience and style. As with any message, it's crucial to test its effectiveness with your fans and fine-tune it based on their reactions.
Audiences are diverse and what works for one creator might not work for another. It's all about finding that golden ticket that resonates best with your unique fan base.
While crafting your messages, you can edit and customize the AI-generated text as much as you like. Additionally, to make your messages feel more personal, remember to use name placeholders. Personalization can go a long way in establishing a stronger connection with your fans.
Our goal with these integrated features is to make your messaging process as smooth and effective as possible. Use them wisely to maximize your engagement and your success on OnlyFans.
Seamless way to manage chats by automatically generating replies based on your preferred settings.
Open the AI Settings page for the specific creator where you want to enable auto-generated replies.
Choose up to two AI buttons for which you want replies to be auto-generated. Enable the Auto-generate feature for each selected button.
After enabling Auto-generate, wait for approximately 10 minutes to allow the new settings to synchronize across the platform.
Once synced, the selected AI buttons will automatically generate replies each time you open a chat with fans, enhancing the efficiency of your interactions.
The Auto-Generate feature is designed to simplify your chat management, enabling you to focus on other important aspects of selling content.
Enjoy the blend of AI efficiency and personal touch in every conversation.
An error message stating “Wrong Creator” appears during the login process.
Check Selected Icon
Ensure the correct profile picture is selected on the left side of the interface.
Free and Paid Page Accounts
If accessing a model with both Free and Paid pages, verify that they are registered on OnlyFans as two separate accounts with distinct login credentials.
Verify Login Credentials
Double-check the username and password you are using. They may belong to a different account.
Contact Support
If steps 1 to 3 do not resolve the issue, reach out to our support team for further assistance.
Always keep your login information secure and up-to-date.
Regularly update your browser or app to ensure compatibility.
For further help or if you experience other issues, please contact our support team.
The "Captcha wrong" error appears when attempting to pass the captcha during the login process for the Creator account. This issue may occur even if the captcha is successfully completed.
Don't make many attempts when this error happens, OnlyFans has limits on the number of attempts.
The issue can be resolved by temporarily changing the proxy to Singapore. After completing the CAPTCHA, it is essential (!) to switch the proxy back.
Switch proxy to Singapore
Go to → Open Settings → Proxy settings and change the proxy to Singapore.
Retry completing captcha
After switching the proxy, attempt to pass the captcha again.
Contact support
If the error persists after trying these steps, contact our support team.
Switch proxy back after completing the captcha
Set the proxy used before the switch. We recommend to set up proxy with the closest country to chatter. You can read more about proxy management in our .
The "Allow 3 seconds" error is a system message from OnlyFans that appears when attempting to send certain requests too frequently (e.g. publishing posts and sending direct/priority messages more often than OnlyFans allows).
This error occurs due to the following reasons:
Publishing posts and sending direct/priority messages too frequently.
There is an incorrect Time Delay in Priority Mass Messages
OnlyFans limits the frequency of certain actions to ensure they are performed by a single creator in a natural manner. The platform restricts some requests to once every 3 seconds, assuming that one person cannot perform multiple actions within that timeframe.
The Priority Mass Messages feature sends individual private messages to each fan with a customizable time interval.
If the time interval is set too short, OnlyFans may detect it as spam and trigger the "Allow 3 Seconds" error.
The OnlyFans system does not differentiate between scheduled and regular publishing.
If multiple SFS posts are scheduled too close together, the system may flag them, resulting in errors.
Identify the Cause of the Error
If the error occurs due to multiple actions performed at the same time, prioritize the most important action and pause the others temporarily.
Adjust the Time Delay in Priority Mass Messages
If sending to 450 fans or fewer, set the time delay to 3 seconds per message.
If sending to more than 450 fans, increase the delay to at least 4-5 seconds to prevent system detection as spam.
By following these adjustments, you can avoid disruptions, ensure messages are sent successfully, and comply with OnlyFans' limits.
If you're experiencing performance issues or OF loading issues due to local restrictions, adjusting specific settings can help. Below, we explain three advanced options: Disable OnlyFans Proxy Bypass, Disable OnlyFans JavaScript Cache, and Disable Hardware Acceleration.
This setting determines whether some static OnlyFans files can be loaded directly through the IP of the user's device (without proxy). It helps speed up page loading, but may cause loading issues in regions where OnlyFans is blocked.
Default State: Enabled
When to Disable: If OnlyFans is blocked in your country, and you need all resources to load through a proxy.
Effects: Disabling this ensures all files load via the proxy. It does not impact vault loading and won’t cause any harm to the account.
JavaScript caching allows OnlyFans to store and reuse JavaScript files, improving performance and loading speed.
Default State: Disabled (By default, JavaScript caching is enabled)
When to Enable: Only if you encounter a specific issue that requires JavaScript caching to be disabled.
Effects: May slow down page loading. We do not recommend enabling this setting unless necessary.
Hardware acceleration shifts certain tasks from your PC’s CPU to the GPU, improving performance in many cases. However, in some situations, it may cause graphical issues or high system load.
Default State: Disabled
When to Enable: If you experience lags, high CPU usage, or graphical glitches while using OnlyFans.
Effects: Forces software rendering, which may reduce the load on weaker PCs and fix graphical issues.
Browser settings on Windows can be accessed by right-clicking on the Monster logo:
On MacOS, you can access settings via menu bar at the top:
The Quick Reply feature lets you instantly greet fans from the Notifications tab, helping you make a great first impression while saving longer chats for later.
Go to the “Notifications” Section You'll see a Quick Reply option next to the notification.
Click the Quick Reply Button A message window will appear, allowing you to type a quick greeting.
Write Your Message and Send Once sent, the Quick Reply window will disappear from your notifications, and the fan will receive your message.
One-time use: Once a Quick Reply is sent, the button disappears for everyone on the account, ensuring fans don’t receive multiple quick replies.
Continue the conversation anytime: A chat icon next to the Quick Reply button lets you open a full chat with the fan instantly.
By using Quick Reply, you can engage fans quickly and save time, keeping interactions smooth and efficient while leaving space for deeper conversations later.
Session synchronization errors typically occur when the browser or application fails to maintain a consistent user session. This could be due to a variety of reasons such as browser glitches, software conflicts, or session timeout issues.
Restart the Browser
Completely close your browser and then reopen it. This can help reset the session and resolve synchronization issues.
Check your connection
Ensure a stable and strong internet connection, as poor connectivity can contribute to such issues.
Contact Support
If the problem continues after trying these steps, please, contact the support team for help.
This error occurs when OnlyFans blocks all actions on a specific page.
OnlyFans can temporarily or permanently restrict access to certain actions.
This may happen for several reasons, including short-term issues or extended account limitations.
1. Check if the issue also appears when using OnlyFans directly (outside the CRM).
2. If the error occurs on the OnlyFans platform as well, please contact OnlyFans Support to resolve the issue.
If you have any further questions, feel free to reach out to our support team—we’re here to help.
Traffic Metrics V2.0 introduces an advanced analytics system with comprehensive filtering capabilities, allowing creators and agencies to analyze both external and internal traffic with greater precision. This first release focuses on providing detailed insights through a powerful, multi-dimensional filter framework.
At the core of Traffic Metrics V2.0 is a comprehensive filtering system that enables deep traffic analysis across various dimensions and time periods. With this enhanced visibility, you can better understand traffic performance across multiple dimensions and time periods, gaining deeper insights into your audience acquisition and revenue generation patterns.
The system displays all traffic sources, including Tracking Links, Trial Links, and Direct Traffic (traffic acquired outside of specific links) in a unified interface. This comprehensive view gives you the full picture of your traffic performance.
For Tracking and Trial Links: You can view click counts, fan acquisitions, and earnings (depending on your filter settings - specifically the fan subscription period and spending timeframe).
The dashboard in OnlyMonster provides agencies, organizations, and solo creators with a comprehensive view of various metrics and indicators across their organization. The key feature is the ability to compare these metrics to understand process developments and identify areas for improvement.
When multiple team members manage chats for the same creator, distinguishing between different conversations can become difficult. The Enhanced Color Chats Splitting feature solves this by assigning distinct colors to conversations based on fan IDs, improving coordination and visual clarity across the team.
We've upgraded our color splitting system from a simple 2-color approach (odd/even) logic to a more advanced multiple-color system (up to 6) that provides enhanced visual clarity for larger teams.
Using emojis can enhance your conversations and improve connections with your audience, potentially increasing fan satisfaction, loyalty, and revenue.
You can easily customize your Emoji Bar via the Edit (1) and Add Emoji (2) buttons. This allows you to:
Add your most frequently used and favorite emojis for quick access.
The CheckBox is a customization tool in OnlyMonster that allows each member to create a personalized workspace tailored to their needs.
By using the CheckBox, members can modify and add various elements for an optimized workflow.
This guide outlines the CheckBox settings and functionality to help you effectively customize your workspace.
The CheckBox is located in the OnlyMonster Widget on the Creator page:
1. Navigate to the bottom-right corner.
2. Open the Settings section.
OnlyMonster's Vault Management provides an end-to-end media solution, from media uploading to labeling previously sent content, adding tags, PPV History and other features.
Create an extensive library of templates, each containing relevant text, media, and pricing options. This allows you to maintain a consistent tone and style in your communications and deliver the right content to your fans.
Use Template Tags to quickly and easily locate the templates you need. These tags act as organizational tools, functioning like folders, to help you categorize and manage your template library efficiently.
Incorporate notes within each template
Discover how to utilize 14 unique writing styles, the Shorthands mode for an authentic tone, and the Lowercase feature to transform your conversations.
This innovative feature, located on the right side of your screen next to the preset emoji bar, transforms your thoughts into engaging content.
The AI Magic Box is conveniently located in your messages right next to the preset emoji bar. Just click on it whenever you need a little creative boost.
Whether you're brainstorming chat responses, cooking up video scenarios, or crafting eye-catching mass messages, the AI Magic Box can help. Write your thoughts or ideas in the box, even in your native language, and watch it work its magic.
Our AI turns your inputs into informal English, adapted for the conversational style common on OnlyFans. The result is a well-crafted message ready to captivate your fans.
The Fan Labels & Tags feature is designed to make browsing through a long list of chats more convenient and efficient.
With OnlyMonster browser, fan avatars are replaced with Labels, allowing you to quickly identify which fans require immediate attention. We classify labels as follows:
Put a mouse pointer over the fan’s label to view the hint about its PPV activity.
Additionally, we mark fans based on their subscription status:
New: Subscribed less than 7 days ago.
Supports up to 6 distinct colors
Uses a mathematical algorithm for even color distribution
Improves clarity and workflow efficiency for large teams
The system calculates color assignment based on fan IDs using the following logic:
Take the fan ID and divide it by the total number of enabled colors (up to 6)
If the result is a whole number → assign the first color (index 0)
If the result has a decimal → calculate the remainder to determine the color index
fan_id ÷ 6 = result
If the result is a whole number:
→ Color index = 0 (first color)
If the result has a decimal:
→ Find the integer part of the result
→ Multiply by 6
→ Subtract it from the original fan_id
→ This gives you the color index (1-5)
Fan ID: 300926977
300926977 ÷ 6 = 50154496.1666...
Since this has a decimal, we calculate the remainder:
Integer part: 50154496
50154496 × 6 = 300926976
300926977 - 300926976 = 1
Color index 1 = the second color is used
Navigate to Creator Tab → Creator Settings
Scroll to the Color Chats Splitting section
Select how many colors you would like to use (up to 6 colors available)
Switch the toggle to activate the feature
The system will automatically apply the color algorithm
Click on any color square to open the color palette
Select your preferred color from the available options
Click Update Colors to save changes
Colors will be immediately applied to existing and new conversations
Improved visibility: Six distinct colors provide better visual distinction than the previous 2-color system
Faster identification: Team members can instantly recognize which chats they’re responsible for
Supports large teams: Designed for high-volume creator workflows
Even distribution: The mathematical algorithm ensures relatively balanced color assignment
Integrated UI: Color indicators appear directly in the chat/message view
Chat hiding & Fan blocking
Unsend Message
Add (Upload) New Media
Delete Media from Vault
Promotions


Keeps the Widget open after every page reload, opening a new tab, or launching the application.
Hides the Message Templates window above the chat window when checked.
Enables in-app notifications for fans appearing online.
For more details, see the Real-Time Alerts article.
Mutes the sound for Real-Time Alerts when checked.
Shifts the interface to the left side of the screen for easier navigation.
When unchecked, the main interface is centered on the page.
Removes text labels from the left sidebar, leaving only icons for a cleaner workspace.
Displays the original text alongside the translated text when enabled.
Helps to provide better context by using both versions.
Blurs all media on the page, including fan icons, to ensure privacy while working in public places.
Adds a badge under the fan’s avatar showing the amount spent.
Helps prioritize chats with no need to switch views.
Replaces fan avatars with icons representing their status and behavior.
Reduces device load and enhances chat prioritization.
For details, refer to the Fan Labels & Tags article.
Removes muted chats from the list, keeping the chat window focused on active conversations.
Hides chats with verified non-spend users from the list, such as creators with the same purpose.
By enabling and customizing these CheckBox options, you can create a streamlined, efficient workspace that aligns with your preferences and workflow.
Use Ctrl + Plus/Minus (Windows) or Cmd + Plus/Minus (Mac) to zoom in or out. This feature allows you to customize the display according to your comfort.


Change File Details: Edit descriptions, tags, and preferred prices.
Rename Folders: Assign specific names for convenience and clarity.
Link/Unlink Folders: Share folders with other accounts, move folders to a different account, or detach shared folders.
Delete Media: Allows you to delete files and folders.
Shift Title: Add a title to the Shift.
Date Selection: Set the start and end time for the Shift.
Assign Creators or Groups: Choose either a specific creator or a creators’ group to assign to the shift. For optimal performance, it’s recommended to create individual Shifts per creator or creators’ group.
Assign Chatters: select the Team Members who will work during this Shift.
Set Repetition Options:
Repeat On: Choose the specific days of the week for the Shift to repeat.
End Date of Repeat: Specify the date when the Shift Repetition should stop. If no end date is selected, the shift will continue to repeat indefinitely until deleted.
If no days of the week are selected the system will automatically set the shift as a one-time occurrence, ending on the same day it starts.
Once the changes are made — click Save to apply them.

For Direct Traffic: You can see fan counts and revenue shown for the period selected in the Earnings Date Range filter.
Traffic Metrics V2.0 includes a powerful three-filter system designed to give you precise control over how traffic and revenue data is displayed.
This filter allows you to analyze statistics based on when fans subscribed through your links, regardless of when the links were created. When you select a date range, the dashboard will show:
Click counts (for Tracking and Trial Links)
Fan acquisition totals (for all traffic types, including Direct Traffic)
N/A Values in Clicks: If click data is unavailable for a specific link during the selected period, the Clicks column will display N/A (Not Available).
This filter only includes fans who subscribed within the selected range.
Use this filter to analyze revenue generated by fans who subscribed during the selected Fan Subscription Date Range.
The system will calculate earnings only within the specified earnings period.
You can track how much revenue was generated during this window by fans acquired via Tracking Links, Trial Links, or Direct Traffic.
Important: The Earnings Date Range is dependent on the Fan Subscription Date Range and cannot begin earlier than the subscription period.
This filter lets you narrow your analysis to links created during a specific time period.
Only links created within the selected Creation Date Range will be included in your analytics.
Useful when evaluating the performance of recently launched campaigns or testing link-specific strategies.
When you open the Traffic Metrics page, the Creation Date Range is automatically set to the last 3 months.
Here’s how the three filters interact to shape your traffic analysis:
Creation Date Range: 1st–3rd → The system will only consider links created during this period.
Fan Subscription Date Range: 4th–5th → You’ll see clicks and fan acquisitions from the selected links, but only for fans who subscribed during this timeframe.
Earnings Date Range: 6th–7th → Revenue data will reflect earnings generated during this period by fans who subscribed on the 4th–5th through links created from the 1st–3rd.
This layered filtering approach allows you to analyze performance from creation → acquisition → revenue with high precision.
The main dashboard offers flexible viewing options to match your analysis needs. You can view All Traffic to see Tracking Links, Trial Links, and Direct Traffic together in one comprehensive overview. Alternatively, you can focus on specific traffic types by selecting Tracking Links only or Trial Links only.
By using search you can quickly find a link by its name, even if you have a large number of links. The search is case-insensitive and supports partial matches, making it easier to find specific links.
Earnings are credited to the fan’s most recent subscription link — also known as rolling attribution.
When a fan subscribes through a new link, all future earnings are automatically attributed to that latest link.
This ensures that revenue is always connected to the fan’s current active subscription source, not historical links they previously used.
This model helps you track live traffic effectiveness, not legacy activity.
With Double Attribution, earnings are attributed to every link the fan has subscribed through.
The first subscription includes all future earnings, while later subscriptions track only new spend — without affecting earlier links.
You can customize how revenue is displayed in the Traffic Metrics dashboard:
Gross Earnings — Shows total revenue before deductions
Net Earnings — Displays earnings after OnlyFans commission
Additionally:
Hide Zero Earnings Toggle
Activate this to filter out links that haven’t generated any revenue
Helps you focus only on performing traffic sources
Enable this toggle to display deleted links alongside active ones.
Deleted links will appear with their full historical performance data, allowing for complete revenue tracking and trend analysis, even for removed campaigns.
Tags help you organize and categorize your traffic links for easier management. Use custom tags to quickly identify, filter and group related links.
You can create new tags directly from the Traffic Metrics table by entering a name and optionally selecting a color.
Tag limits:
Maximum 300 tags per organization
Up to 20 tags per traffic link
You can rename any existing tag. When a tag is renamed, the change is automatically applied to all traffic links using that tag. .
You can remove tags you no longer need. If a tag is currently assigned to traffic links, the system will ask for confirmation before deletion. Once deleted, the tag will be removed from all associated traffic links.
You can assign tags directly from the Traffic Links table:
Tag Assignment:
Choose from existing tags or create a new tag while assigning
Assign one or multiple tags to any traffic link
Tags can be reused across multiple traffic links
Shows when the statistics for Tracking and Trial Links were last updated. This helps you understand how recent the data is.
Tracking Links are updated every hour at :10
Trial Links are updated every hour at :20
The traffic overview displays essential metrics for each source including link names, creation dates, clicks, fans acquired, and earnings. Direct Traffic appears as a separate item showing subscribers and earnings not attributed to specific tracking or trial links.
This data helps you identify your most effective traffic sources, understand fan acquisition patterns, and make informed decisions about resource allocation and campaign optimization.
Creators: Displays the total number of active OF account profiles.
Team Members: Shows the number of active staff profiles.
Spenders: Indicates the number of fans who have made at least one purchase or tipped.
Creator: Allows you to select specific creators whose data you want to see on the dashboard.
Multiselect Field: Users can select multiple creators simultaneously. The default state is 'All creators'.
Clear Button: Clears all selected elements in the field.
Group: This filter will also display groups of creators as separate entities for selection, allowing users to quickly choose a pool of creators that meet certain criteria. Grouping can be made by assigning specific tags to creators on the creator settings page.
Main Time Range and Compare To Field: Select the main time range and a comparison period to analyze performance across two different periods.
Exact Time Selection: Choose specific times in the AM and PM for precise data analysis.
OnlyFans Time Zone: Select the OF time zone to align your data with OF statistics. However, note that OF time range and data may sometimes differ from your dashboard data.
Toggle 'Include Subscription Revenue': Switch the toggle to include income from subscriptions. This is useful if you count subscription revenue in favor of your chatters.
Data is color-coded: green for growth and red for decline, compared to the range specified in the "Compare to" field.
These metrics provide combined information from the selected creators:
Total Revenue: General income from all sources.
Sales Revenue: Income from messages and tips.
Subscription Revenue: Income from subscriptions.
PPV Revenue: Revenue from Pay Per View messages.
Tips Revenue: Income from tips.
These metrics offer detailed insights, including total and average information from the selected creators:
Monthly Revenue Run Rate (RR): Predictive metric estimating your total revenue for the current month based on daily earnings since the beginning of the current month.
30-Days Revenue Run Rate: Predictive metric projecting revenue for the next 30 days based on the last 7 days.
Spenders: Number of fans who made one or more purchases or tips during the selected period.
APC (Average Payment Count): Shows the average number of payments per paying fan.
APV (Average Payment Value): Measures the average amount spent per transaction.
ARPPU (Average Revenue Per Paying User): Tracks the average revenue generated from each paying fan.
Total Revenue: Aggregated income from all sources over the selected period. This metric provides a comprehensive view of your overall earnings.
Revenue from New Fans: Income generated from fans who subscribed within the selected timeframe. This helps evaluate the effectiveness of new fan acquisition strategies.
Revenue from Existing Fans: Income from fans who subscribed before the specified period. Indicates ongoing engagement and loyalty from existing fans.
Like-for-Like (LFL): Compares revenue from the selected period with the same period in the previous month. This helps spot seasonal trends and performance fluctuations.
Monthly Revenue Run Rate: Predictive metric estimating your total revenue for the current month based on daily earnings since the beginning of the month.
30-Days Revenue Run Rate: Predictive metric projecting revenue for the next 30 days based on the last 7 days' performance.
Subscription Revenue: Earnings from subscriptions and renewals. Highlights the importance of recurring income streams.
New Fans: Number of first-time subscribers during the selected period. Smart cloud automation works to attract and collect new fans.
Subscription Revenue from New Fans: Revenue from subscriptions of fans who subscribed for the first time during the selected period.
Renewed Fans: Number of fans who renewed their subscriptions during the selected period. Indicates the effectiveness of retention strategies.
Subscription Revenue from Renewed Fans: Income generated from fans renewing their subscriptions during the selected period.
Sales Revenue: Revenue from messages and tips, gauging the direct monetization from chatters.
PPV Revenue: Income from Pay Per View messages. Provides insight into the effectiveness of exclusive content strategies.
Tips Revenue: Income from tips transactions, reflecting fan satisfaction and support.
Posts Revenue: Total revenue from posts during the selected time period. Percentage is calculated by comparing to Total Revenue.
Sales Ratio: Comparison of sales revenue to subscription revenue, offering insights into the balance between direct sales and recurring income.
Tracking Links Income: Performance of tracking links over the specified period. Helps optimize marketing efforts.
FTL Income: Performance of trial links during the specified period, indicating the success of trial promotions.
FTL Fans: Number of fans subscribed through trial links during the specified period. Indicates the effectiveness of free trial strategies.
Monthly Subs Run Rate: Predictive metric estimating the number of new subscribers for the current month based on subscription trends.
30-Days Subs Run Rate: Predictive metric estimating the number of new subscribers in the next 30 days based on the last 7 days' performance.
Spenders: Number of fans who made one or more purchases or tips during the selected period, excluding subscriptions. Measures direct engagement.
APC (Average Payment Count): Average number of payments per paying fan. Highlights engagement intensity.
APV (Average Payment Value): Average amount spent per transaction. Provides insight into spending behavior.
ARPPU (Average Revenue Per Paying User): Average revenue generated from each paying user. Crucial for understanding the value of your active fans.
Click on 'Columns' and select or unselect columns to display only the metrics they need on the dashboard, providing a corresponding view.
You can export all the data into a .csv file for further analysis or reporting.
Implement sorting by clicking on the column title or the arrow next to the title.
First click sorts data from highest to lowest.
Second click sorts data from lowest to highest.
Third click resets sorting to default.
Click another column title to reset the current sort and apply sorting to the corresponding column.
The enhanced dashboard offers a comprehensive and intuitive way to track, compare, and analyze key metrics across your organization. With the ability to analyze different time periods and groups of creators, as well as their traffic sources and sales, you gain valuable insights into your business performance. By understanding where your metrics fall short, you can identify the causes and consequences of these declines. Conversely, where you see improvement, you can recognize progress and the most effective management strategies, sales techniques, and traffic sources.
We recommend recording your results weekly or at least monthly, adjusting your strategy based on these insights, and continuously monitoring your progress. This proactive approach enables you to optimize processes, enhance performance, and ultimately drive better results for your organization.
For any questions or additional support, please reach out to our Support Team.
Streamline your messaging process by organizing emojis that suit your communication style.
Customizing the emoji bar ensures that your preferred emojis are always at your fingertips, saving you time and helping you maintain a consistent tone in your messages.
If you manage a team of chatters, you can create a unified emoji bar for each creator. This will keep fan interaction consistent among different chatters and emphasize your model's appearance and personality.
You can create an emoji bar the following way:
Go to the Creators section.
Select Creator Settings by clicking the Open Settings button.
Scroll down to the Emoji Customization block.
Select up to 15 emojis that you want your chatters to use.
Click Update to apply the changes.
Once applied, all team members will use the same set of emojis for that creator, ensuring brand consistency across conversations.
$value Paid: Content sent as a paid message and purchased by the fan, marked in green.
Unpaid: Content sent as a paid message but not purchased by the fan, marked in red.
Posted: Content previously posted on the feed, marked with “Posted” label.
The label system makes it easier to track content sent to fans, ensuring no duplicates and preventing double-posting.
All media sent in the chat, along with their status label, can be checked in the Detailed Fan Info → Gallery Section.
PPV History can be found in the Fan's Overview section. Here, you can view:
A complete list of content sent to the fan, including text, dates, and prices.
Purchase statistics, showing which content was bought or ignored.
Filters to display only purchased content or only content sent for free.
The option to edit descriptions and tags is available only for media files located in custom folders.
Tags: Assign keywords to each media file for efficient searching.
Descriptions: Add a brief overview or context to each media file.
Recommended Price: Assign a suggested price to guide chatters during sales.
View Attached Scripts: the feature displays a list of scripts where the media is already included, providing clarity on its usage across various campaigns or messages.
With tags in place, searching and sorting media becomes faster and more efficient.
Use specific tags to filter your media library quickly.
Avoid scrolling through your entire collection by locating relevant content instantly.
If necessary, previously uploaded and stored media files can be downloaded. This option is only available if the team member has the appropriate permission.
Assign a Sorting Number to each template to control the order in which they appear in your chat with fans. This prioritization system helps you divide media sets into smaller messages/scripts, making them easier to find and use within your workflow.
The Message Templates feature is an essential tool for streamlining your messaging strategy, offering seamless synchronization across all team members with a premium OnlyMonster plan.
This feature facilitates collaboration by allowing team members to share and access templates, fostering a cohesive messaging strategy across your fanbase. Provides flexibility for chatters to adapt and customize templates on the fly, ensuring personalized and relevant content for each fan.


Grant permission to manage AI settings to different roles and user groups as needed.
Tailor AI settings separately for each creator, ensuring personalized and relevant interactions.
Utilize and customize the 10 default AI modes to align with your communication goals. See more
Modify each AI mode button to better suit your needs.
Rearrange these buttons using the drag & drop feature for a more intuitive interface.
Craft your own AI modes by creating additional buttons with custom names, expanding your response capabilities.
Select from 14 different writing styles, allowing you to match the tone and approach best suited to each conversation.
Lowercase: Mimics casual, fast typing for personal, informal replies. Shorthands: Adds authentic, conversational tone with everyday abbreviations. No Emojis: Provides straightforward, text-focused communication for clarity. No Commas: Creates smoother, fluid sentences for quick, on-the-go messaging style.
Access detailed statistics by creators, chatters, and specific buttons to understand engagement and response effectiveness.
All AI settings are synced every 5 minutes, ensuring your configurations are always current.

Contrary to its name, the AI Magic Box is designed to think outside the box, giving your ideas a fresh perspective. It takes your creative thought process and expands it, improving your content strategy in the process.
Get ready to receive a powerful and insightful message from the AI! Don’t be surprised by its length or depth—this is your creative companion, designed to elevate your work. Feel free to customize and refine the generated message to perfectly match your vision.
Remember, the AI Magic Box is your assistant, not a rigid template. It's there to help you elevate your creativity and make content creation a breeze. It's important to review and adjust the AI-generated content to ensure it aligns with your unique voice and style.
The AI Magic Box is designed to be a valuable asset in your content creation toolkit. With this feature, your OnlyFans strategy can reach new heights of creativity and engagement. So go ahead and give it a try, and see the difference it makes in your fan interaction.
Remember, the magic is in your hands!

Rebill Off: The rebilling is turned off.
Expired: The subscription is expired.
For even greater customization, you can use custom Labels by assigning a unique emoji to specific lists. This feature can be found next to the button for creating new list automation.
Moreover, under each avatar, you'll see the total amount of money fans have spent, providing valuable insights into their engagement and spending habits.

The process of adding the creator was interrupted and not completed.
To resolve the “Proxy Missing” error, follow these steps:
Go to the Creators tab.
Click on Open Settings for the creator with the issue.
Navigate to Proxy Settings and select a proxy to activate.
We recommend choosing a Primary Proxy from the nearest location: Germany, Singapore, or the USA.
An icon labeled Selected will appear next to the chosen proxy. Ensure you’ve selected the closest proxy to your location.
For more details on proxy settings, review the article Proxy Management
If you need further assistance, please contact our support team.


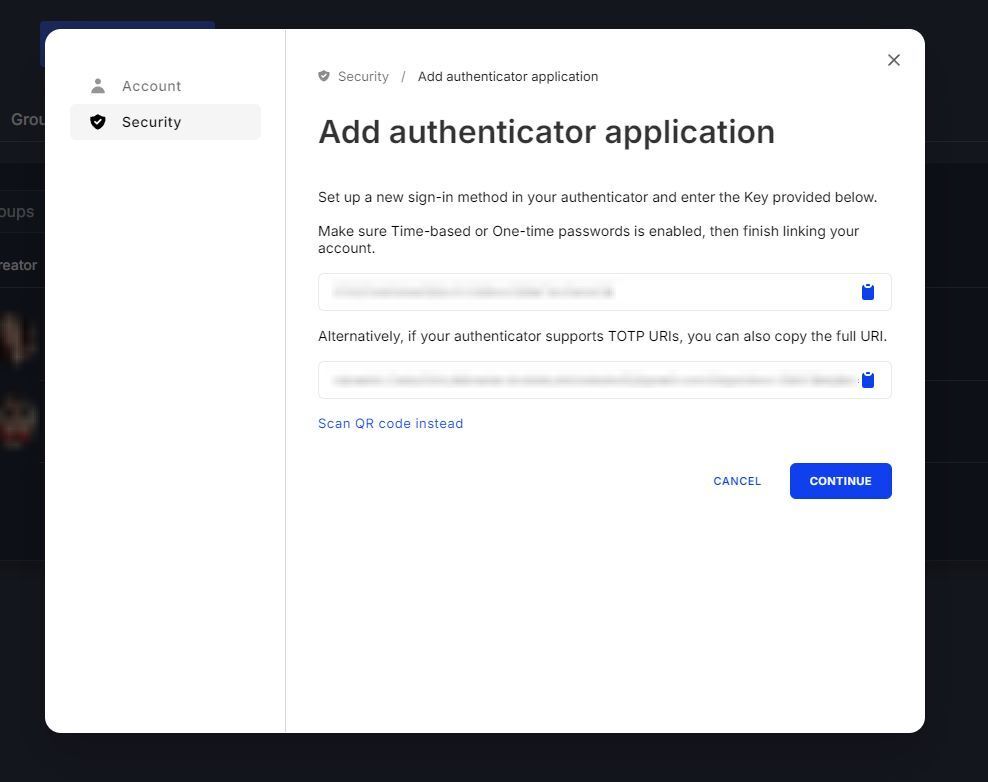

This article highlights the OnlyMonster Menu Bar - menu items, their features, navigation and hotkeys for macOS and Windows.
MacOS Menu bar
The menu is located at the top of the screen.
About OnlyMonsterBrowser: View the application version and developer information.
Services: Access to macOS system services.
Hide OnlyMonsterBrowser: Hide the current application window. Hotkeys: ⌘ + H
Hide Others: Hide all other application windows. Hotkeys: ⌘ + ⌥ + H
Show All: Show all hidden windows.
Quit OnlyMonsterBrowser: Exit the application. Hotkeys: ⌘ + Q
Open Tab: Open a new tab. Hotkeys: ⌘ + T
Open Location: Go to the specified URL. Hotkeys: ⌘ + L
Close: Close the current tab. Hotkeys: ⌘ + W
Duplicate Tab: Create a duplicate of the current tab. Hotkeys: ⌘ + D
Go Back/Go Forward: Navigate backward or forward in the browsing history. Hotkeys: ⌘ + [ / ⌘ + ]
Next Tab/Previous Tab: Switch between open tabs. Hotkeys: ⌘ + ⇧ + → / ⌘ + ⇧ + ←
Switch Tab: Jump to a specific tab 1 up to 9 Hotkeys: ⌘ + 1…9
Subscriptions: New subscriber notifications.
Purchased Messages: New purchase notifications.
Tips: New tip notifications.
New Fans Messages: New fans messages notifications.
(See for details)
Undo/Redo: Undo or redo a text in the typing field. Hotkeys: ⌘ + Z / ⌘ + ⇧ + Z
Cut/Copy/Paste: Cut, copy, or paste text/elements. Hotkeys: ⌘ + X / ⌘ + C / ⌘ + V
Select All: Select all text in the text box. Hotkeys: ⌘ + A
Find: Search for text on the page. Hotkeys: ⌘ + F
Zoom In/Zoom Out: Increase or decrease the page zoom. Hotkeys: ⌘ + "+" / ⌘ + "–"
Reload Page: Reload the current page. Hotkeys: ⌘ + R
Toggle Sidebar: Show or hide the sidebar. Hotkeys: ⌘ + ⇧ + L
Actual Size: Reset the zoom to the default size. Hotkeys: ⌘ + 0
Settings:
.
.
.
(For more details please check the ).
Check for Application Updates: Check whether a new application version is available.
Other:
Clear AppData: Clear cached data to resolve issues or free up space.
Fill: Make the window full-screen.
Center: Center the window on the screen.
Move & Resize: Change the window's position and size.
Full-Screen Tile: Expand the window to full screen. Hotkeys: ⌘ + Ctrl + F
Visit OnlyMonsterBrowser: Visit the website.
OnlyMoster Help: Navigate to OnlyMonster Docs.
Privacy policy: Check the Privacy Policy.
The menu opens by right-clicking on the Monster icon.
Open Tab: Open a new tab. Hotkeys: Ctrl + T
Open Location: Go to the specified URL. Hotkeys: Ctrl + L
Close: Close the current tab. Hotkeys: Ctrl + W
Duplicate Tab: Create a duplicate of the current tab. Hotkeys: Ctrl + Shift + D
Go Back/Go Forward: Navigate backward or forward in the browsing history. Hotkeys: Ctrl + ← / Ctrl + →
Next Tab/Previous Tab: Switch between open tabs. Hotkeys: Ctrl + Tab / Ctrl + Shift + Tab
Switch Tab: Jump to a specific tab 1 up to 9 Hotkeys: Ctrl + 1…9
Subscriptions: New subscriber notifications.
Purchased Messages: New purchase notifications.
Tips: New tip notifications.
New Fans Messages: New fan message notifications
(See for details)
Undo/Redo: Undo or redo a text in chat Hotkeys: Ctrl + Z / Ctrl + Shift + Z
Cut/Copy/Paste: Cut, copy, or paste text/elements. Hotkeys: Ctrl + X / Ctrl + C / Ctrl + V
Select All: Select all text in the text box. Hotkeys: Ctrl + A
Find: Search for text on the page. Hotkeys: Ctrl + F
Zoom In/Zoom Out: Increase or decrease the page zoom. Hotkeys: Ctrl + "+" / Ctrl + "–"
Reload Page: Reload the current page. Hotkeys: Ctrl + R
Toggle Sidebar: Show or hide the sidebar. Hotkeys: Ctrl + Shift + L
Actual Size: Reset the zoom to the default size. Hotkeys: Ctrl + 0
Settings:
.
.
.
(For more details please check the ).
Check for Application Updates: Check whether a new application version is available.
Other:
Clear AppData: Clear cached data to resolve issues or free up space.
Visit OnlyMonsterBrowser: Visit the website
OnlyMoster Help: Navigate to OnlyMonster Docs.
Privacy policy: Check the Privacy Policy.
Priority Mass Messages is a cloud-based OnlyMonster feature that allows you to automatically send mass messages to fans' Priority inbox. A system of advanced filters allows you to fine-tune delivery and improve fan engagement.
On the main Mass Messages page, you can select a Creator and view all Priority Mass Messages campaigns launched for that Creator.
To create a new Campaign, first select the Creator and click the New Campaign button.
Important: You cannot create a campaign without selecting at least one filter from the Fans Audience section. The online filter alone is not sufficient - campaigns with only this filter will not run.
The following information is displayed in the campaign overview:
Message - The content of the message
Status - Current state of the campaign:
Sending - the campaign is active and messages are being delivered to fans based on the selected filters
In Queue - the campaign is waiting in line and will begin once the current active campaign is completed.
Stopped - the campaign was manually paused and is no longer sending messages
Unsending - Messages are currently being removed via the Auto-Unsend feature, based on your configuration.
Progress - Percentage of messages sent
Audience Filter - Displays selected filters for targeting, including sending conditions and exclusion lists.
Sent - Total number of messages successfully sent.
Unsent - Number of unsent messages.
Price - Price set for paid messages (if applicable)
Purchases - Number of purchases made from the campaign
Earnings - Total earnings generated from the campaign
Attachments - Number of media files attached to the message
These indicators help you interpret the status of your Priority Mass Message campaigns:
Sent and Unsent columns display a dash (—)
Progress bar remains at 0%
Meaning: The campaign is configured but hasn't begun sending messages yet.
Sent and Unsent columns display a 0
Progress bar shows 100%
Meaning: The campaign ran but no fans matched the selected filters, so no messages were sent.
Important: Only one campaign can be active at a time. If multiple campaigns are created, the first created campaign will start first. Other campaigns will be placed in a Queue and will only start after the active campaign is completed.
To create a Priority Mass Message, select Creator from the dropdown and click New Campaign.
You are now redirected to the Campaign Settings tab, where you need to configure the campaign settings.
To ensure smooth delivery, we process one campaign at a time. When multiple campaigns are scheduled for the same moment, they'll be placed in a queue.
You cannot create a campaign without selecting at least one filter from the Fans Audience section. The online filter alone is not sufficient - campaigns with only this filter will not run.
You can schedule your Priority Mass Message campaign to start at a specific date and time:
To schedule a campaign:
Toggle "Schedule at" ON
Select the desired date using the date picker
Select the time for the campaign to start
Choose the timezone reference:
Important: Scheduled campaigns will automatically start at the specified time. If another campaign is active when your scheduled campaign is due to start, your campaign will be queued and begin once the active campaign completes.
You can enable the Auto-Unsend feature:
Toggle "Auto unsend message" ON
Select the condition "If not read by fan" or "ALL"
Set the delay period (from 1 hour up to 20 hours)
Note: At least one filter (besides Online only) or a List must be selected to create a campaign. You can choose to send either by filters or by lists. Once you select one option, the other one will be disabled.
When creating a Priority Mass Message campaign, you can apply the following filters to target your audience more precisely:
Fans matching these criteria will be targeted.
Online Only
Target only fans who are currently online.
Subscribed from ... to ...
Filter fans based on their first subscription date. You can set a date range for when fans subscribed.
Spent on selected creator between... and ...
Target fans based on how much they have spent on the selected Creator's page. When activating this filter, you need to specify both minimum and maximum spend amounts.
Spent within current agency between... and ...
Target fans based on their total spending across all models connected to the current agency. When choosing this filter, you need to specify both minimum and maximum spend amounts.
Purchased from selected creator
Filter fans based on recent purchases from the selected Creator:
Less than X days ago
More than X days ago
Purchased within current agency
Filter fans based on recent purchases from any agency model:
Less than X days ago
More than X days ago
For sending a priority campaign to platform lists (custom lists created in the OnlyFans interface, as well as exported dynamic OnlyMonster lists), select the list you want to use from the dropdown menu. The lists refresh every 30 minutes. You can send a campaign to a maximum of 10,000 fans across all selected lists.
You can choose to send either by filters or by lists. Once you select one option, the other one will be disabled.
Fans matching these criteria will NOT receive message.
Active chats within the last
Exclude fans with active chats within the selected timeframe (messages sent by the model only are taken into account):
Minimum value: 15 minutes
Maximum value: 24 hours
Fan Lists
Click here and select lists to exclude - you can select any number of exclusion lists.
Composing the Message: Enter your message text in the input field.
Click the plus (+) icon to open the emoji panel and insert emojis into your message.
To insert the fan's name or custom name:
Click the Dynamic Name button.
Choose between the following options:
Custom Name - Custom name you've assigned (if available)
Fan's Name - Name from fan's profile (if available)
Fan's Name → Custom Name - Uses the fan's name first. If it's missing, the custom name is used.
Custom Name → Fan's Name - Uses the custom name first. If it's missing, the fan's name is used.
First Word from Name
When choosing Fan's Name - switch the toggle ON and the first word from the fan's name will be automatically inserted.
Fallback Name
Set a fallback name below to use when no custom or fan name is available. Use a warm placeholder like "Sweetie" or "Honey" when the fan's name isn't known.
To add free media to your campaign:
Click the plus (+) icon in the Free Media field
Select media from the Vault.
To add paid media to your campaign:
Toggle Paid Media ON
Set the price in the Price field
Click the plus (+) icon in the Paid Media field to upload
You can also create a paid text campaign:
Toggle Paid Text ON
Set the price in the corresponding field
Carefully review all fields and settings. Ensure that at least one filter from the Fans Audience section is selected.
Important: Once the campaign is started, neither the message nor the settings can be edited.
When everything is verified, click Start Campaign to launch.
After launch, the campaign will appear in the campaign list with the appropriate status (Active if it's the first campaign, or Queued if another campaign is already running).
Message Templates V.2 is a powerful template management system that allows you to create, organize, and quickly deploy pre-written messages across your OnlyFans conversations. With intuitive folder organization and seamless platform integration, you can streamline workflows, ensure messaging consistency, and respond to fans faster, while still keeping it personal.
The template system provides a centralized hub where you can organize messages into custom folders and access them instantly during conversations. This helps your team:
Avoid repetitive typing
Maintain message quality
Respond faster while keeping a personal tone.
Templates can include:
Text and emojis
Dynamic fan name variables
Media files
Paid content pricing options
Templates are accessible directly on the OnlyFans platform via a convenient widget.
To begin creating templates, you'll need to select a creator from the dropdown menu and set up your folder structure.
Creating a new folder:
Select the creator from the dropdown list
In the Folders column, click the ➕ icon.
Enter a folder name and press Enter to save.
Once you have at least one folder created, you can start adding templates to it.
After selecting a folder, click the Create Template button to open the template editor.
Message Text
Write your message in the main text field.
You can type or paste text from other sources.
Click the ➕ icon to add emojis anywhere in the message.
There’s no length limit.
Templates support dynamic personalization, allowing you to automatically insert a fan's name into your message. This feature helps maintain a personal connection even when using pre-written templates.
Available name options include:
Fan's Name - Uses the name from the fan's OnlyFans profile
Custom Name - Uses a custom name you've assigned to the fan
Fan's Name → Custom Name - Prioritizes the fan's profile name, falling back to custom name if unavailable
Custom Name → Fan's Name - Prioritizes your custom name, falling back to the profile name if unavailable
First Word from Name
When selecting Fan's Name as your personalization option, you can enable a toggle to use only the first word from the name. This is particularly useful for extracting first names from full names, making your messages feel more casual and personal.
Fallback Name
If neither a fan name nor a custom name is available, you can set a fallback name that will be used instead, ensuring your message always feels personal.
Templates can be configured with paid content options. You can set pricing for both the message text itself and attached media.
Available pricing options:
Paid Text - Set a price for the message content itself, creating a locked message that fans must unlock to read
Paid Media - Attach media files with a set price, requiring fans to purchase before viewing
When setting prices, use a comma (,) as the decimal separator (for example, 4,99 rather than 4.99).
Notes
Use the Notes field to add internal comments visible only to your team. Examples:
“Use after sending teaser”
“Pairs with offer #3 media set”
“Only for active subscribers”
Saving Your Template
Click Save once everything is set. Your template is now ready for use.
After selecting a creator, the dashboard shows all templates organized by folder.
The left sidebar displays folders (newest at the bottom).
The main board shows template content, order, notes, media count, and pricing.
Click the three-dot menu next to any folder to:
Create a new template in this folder
Rename the folder
Delete the folder (deletes all templates inside)
The main template board displays all messages within the selected folder in a comprehensive table view. Each row represents one template and displays key information at a glance.
Reordering Templates
Templates are ordered by a number that controls their display position in both:
The OnlyMonster dashboard
The OnlyFans platform widget
To reorder:
Hover over the drag handle beside the number
Click and drag to reposition
Release to save new order (numbers auto-update).
Each template row shows:
Order Number - The template's position in the sequence
Message Text - Preview of the message content with an indicator showing how many media files are attached
Notes - Any internal notes added for team reference
Price - The set price for paid content (if applicable)
Template Actions
Hover over the right side of any template row to reveal a three-dot menu icon. Clicking this menu provides access to template-specific actions:
Edit - Modify the template content and settings
Move - Transfer the template to a different folder
Delete - Remove the template permanently
Templates are designed for quick access during live conversations on OnlyFans. The template widget provides instant access to your entire template library without interrupting your conversation flow.
You can access templates while chatting with fans on OnlyFans.
Click the template icon (next to the Translator widget)
Or press:
Ctrl + T (Windows)
Option + T (Mac)
Once the template panel is open, browse through your folders to find the message you need. Click on any folder to view its templates.
When you hover over a template, two action buttons appear:
Insert - This option loads the template into the message input field as an editable draft. You can review the message, make any necessary adjustments or personalizations, and then send it manually. This is useful when you want to customize the template slightly before sending.
Send - This option immediately sends the template without any edits. The message is sent exactly as configured, including any dynamic name variables, pricing, and media attachments.
After sending a template, the system provides contextual guidance to help you continue the conversation. A small widget appears below the Fans Overview widget, displaying the next template in the sequence from your selected folder.
When you send that template, the widget automatically updates to show the following one —continuing step by step through your predefined message sequence. This feature helps you:
Maintain a natural and consistent conversation flow
Avoid manual searching for the next message
Send templates directly from the navigation widget for faster responses
You can send templates directly from this widget, making it easy to guide conversations through pre-planned message sequences. Once you reach the end of the sequence, the widget will no longer display additional templates, indicating that the message flow is complete.
If a template contains media:
A media icon will appear in the preview
Hover over it, click a file to preview it in a new tab.
This preview functionality helps you verify that you're sending the correct template with the appropriate media before clicking Insert or Send.
Access to Message Templates is controlled through permissions.
Team members with View Public Templates permission can browse and use templates in conversations, but cannot create, edit, or delete them.
Team members with Edit Public Templates permission have full management capabilities, including creating, editing, deleting templates, and managing folders.
The AI Fan Persona Insights feature helps agency owners and creators gain a deeper understanding of their fans. By analyzing chat interactions, the AI identifies key personality traits, interests, and engagement patterns. These insights allow for more personalized interactions and content strategies, helping you build stronger connections with fans.
The AI gathers data from chat conversations and generates a detailed fan persona profile. This profile includes:
Common topics of interest discussed in chats
Emotional tone and engagement style
Personal preferences and behaviors
By understanding a fan’s persona, you can tailor your interactions to better match their interests.
Once you review a fan’s persona, you can use the Generate Reply button to create a personalized response specifically for that fan. This AI-generated message will be closely aligned with the fan’s unique personality and preferences, making your communication more engaging and relevant.
There must be at least 50 fan messages in the chat to create a Fan Persona. Ensure there are enough messages before proceeding with analysis.
Navigate to the fan’s chat.
Select Fan Persona - Generate Insight from the Fan’s overview menu.
Use the information gathered by AI for your better understanding of the fan you are working with.
Click Persona Reply to create a customized message based on the fan’s persona.
Each Fan Persona generation requires 25 AI credits.
If you don’t have enough credits, you can .
Enabling notifications lets you see important events like subscriptions, purchases, tips, and messages, even when the OnlyMonster app is minimized.
Open the OnlyMonster → right-click on the OnlyMonster logo → Notifications, and choose which notifications you want to receive:
If needed, use the "Disable All" button to turn off message notifications for all profiles at once.
Press the Windows key (⊞) or select it from the Taskbar, then go to Settings:
Navigate to System → Notifications, ensure that Notifications are turned on and "Do not disturb" mode is not activated.
Scroll down to “Notifications from apps and other senders”, find OnlyMonster, and turn on notifications for it:
Open OnlyMonsterBrowser → navigate to menu bar → Notifications → choose which notifications you want to receive.
Ensure that Focus or Sleep mode is not activated.
Go to your System Settings → Notification Center.
Make sure general notifications are enabled:
When a notification appears, you’ll see additional information, such as the name of the model and a fan. Here’s what you can expect from different types of notifications:
Subscriptions: The name of the new subscriber
Messages: The text and the sender's name
Purchases and Tips: The amount and the name of the fan.
You can close the notification by clicking the “✕”. For more options, click the Options button (⋯), where you can either turn off all notifications or go directly to their settings:
Please Note: The notifications will not appear if the fan’s tab is open. To receive notifications, you need to switch to a different tab.
Resetting your password
Click on your profile icon in the upper right corner.
Choose Sign Out to open the login screen.
On the login screen, select Forgot Password?
This will open a browser window. Enter your email and select Forgot Password?
Choose Reset your password.
OnlyMonster will send you a code to change the password, which you need to enter.
Create and confirm your new password.
Your password is now changed, and you’ll need to log in with the new password.
This error message appears when too many requests are sent to the OnlyFans server within a short period. This is not a bug but a system response aimed at preventing excessive server load.
Performing multiple actions on a Creator page, such as opening several tabs, frequently navigating between pages and other, can trigger the "Too many requests. Try again later." error.
If you exceed the platform’s rate limit, the error may appear repeatedly after every action.
Change Your IP Address on the Creator Page
This error occurs when excessive requests are made from a single IP address. Changing your IP can resolve the issue.
To change IP, follow these steps: 1. Navigate to the Creators tab and open Settings.
2. Locate the Proxy Settings section - Primary Provider.
3. Click the Switch IP button next to the selected proxy.
For more information on Proxy Management - check out the .
By following these steps, you can prevent the error from occurring and ensure a smooth browsing experience on the platform.
If the OnlyMonster Browser won't run (an error is displayed, or the application does not open), follow these steps to troubleshoot
Done - the campaign has finished successfully, and all messages have been sent to the targeted audience
Unsent - the campaign was created, but messages were not sent (possibly due to configuration issues or manual cancellation)
UTC - Uses UTC 0 timezone


New Creator Window: Hover the cursor, and select the creator whose page needs to be opened in a new window.
Close Window: Close the current window. Hotkeys: ⌘ + ⌥ + W
Close Creator Session: Close the session of the selected creator from the list.
AutoFill: Auto-fill forms with saved data.
Emoji & Symbols: Insert emojis or special characters. Hotkeys: Fn + E
Minimize: Minimize the window to the Dock. Hotkeys: ⌘ + M
Bring All to Front: Bring all application windows to the front.
New Creator Window: Hover the cursor, and select the creator whose page needs to be opened in a new window.
Close Window: Close the current window. Hotkeys: Ctrl + Shift + W
Close Creator Session: Close the session of the current creator.
AutoFill: Auto-fill forms with saved data.
Emoji & Symbols: Insert emojis or special characters. Hotkeys: Win + >


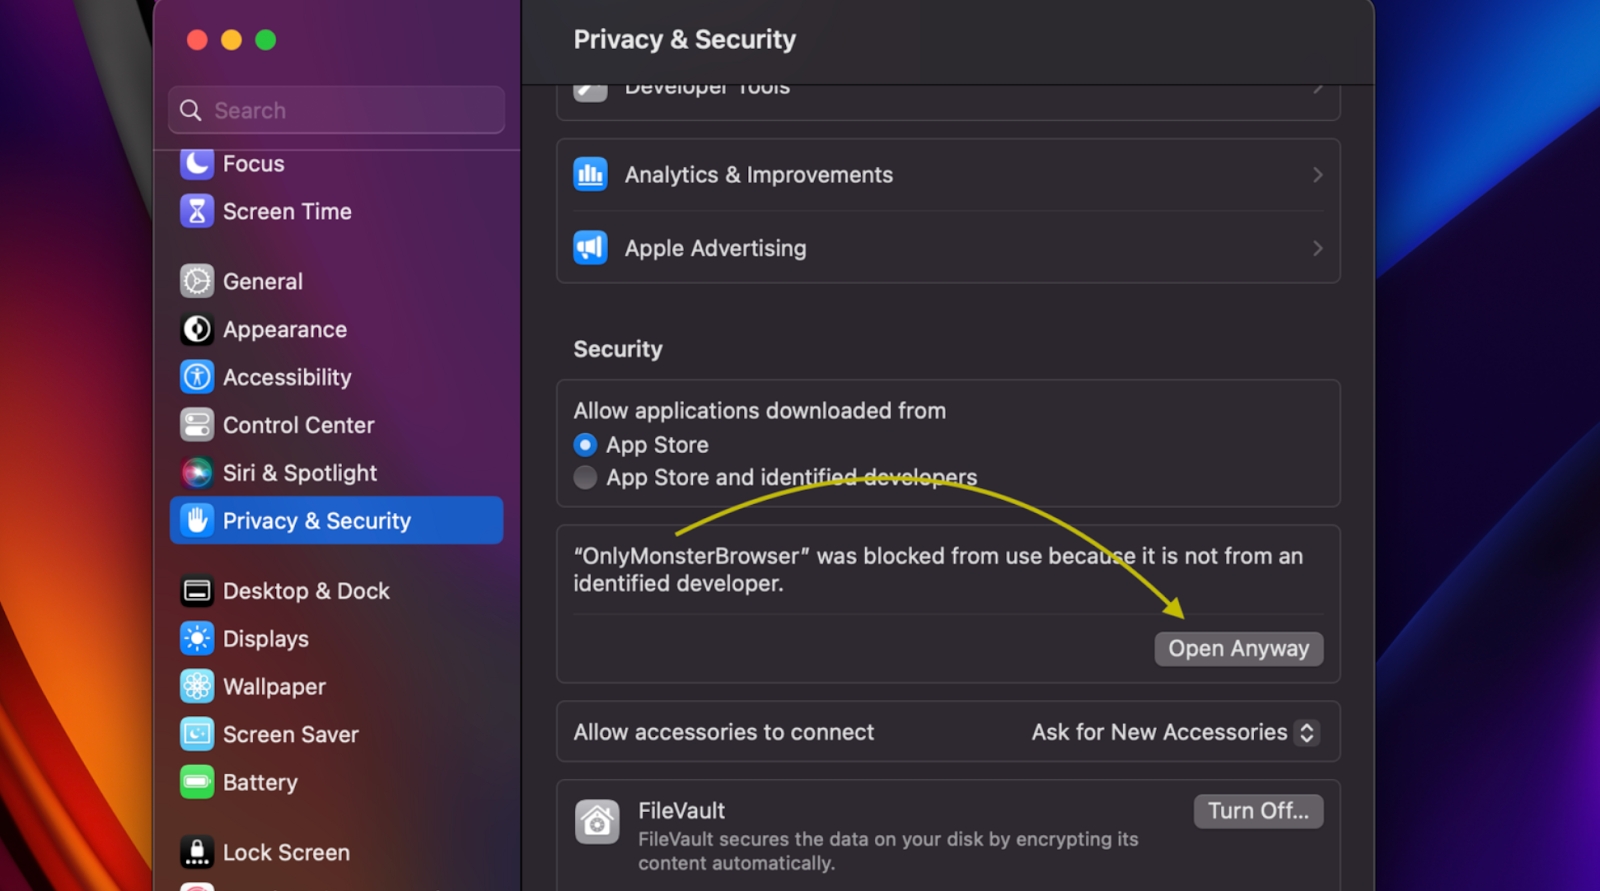

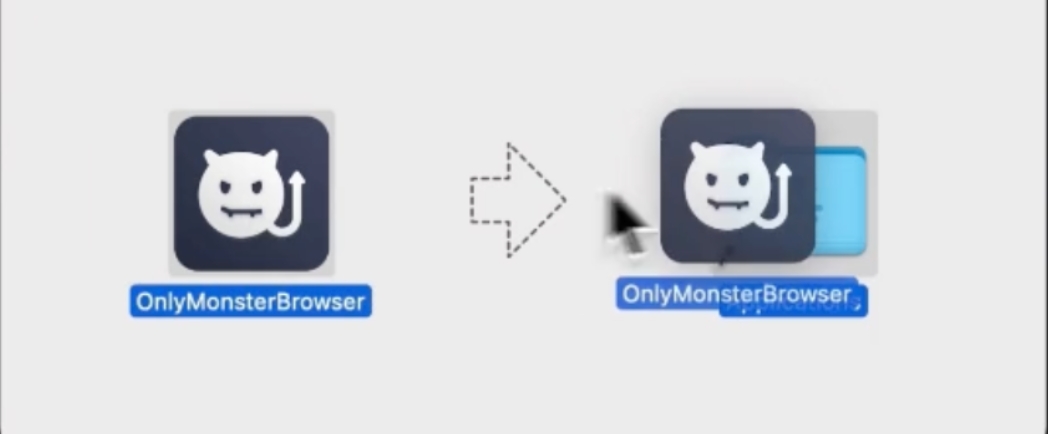
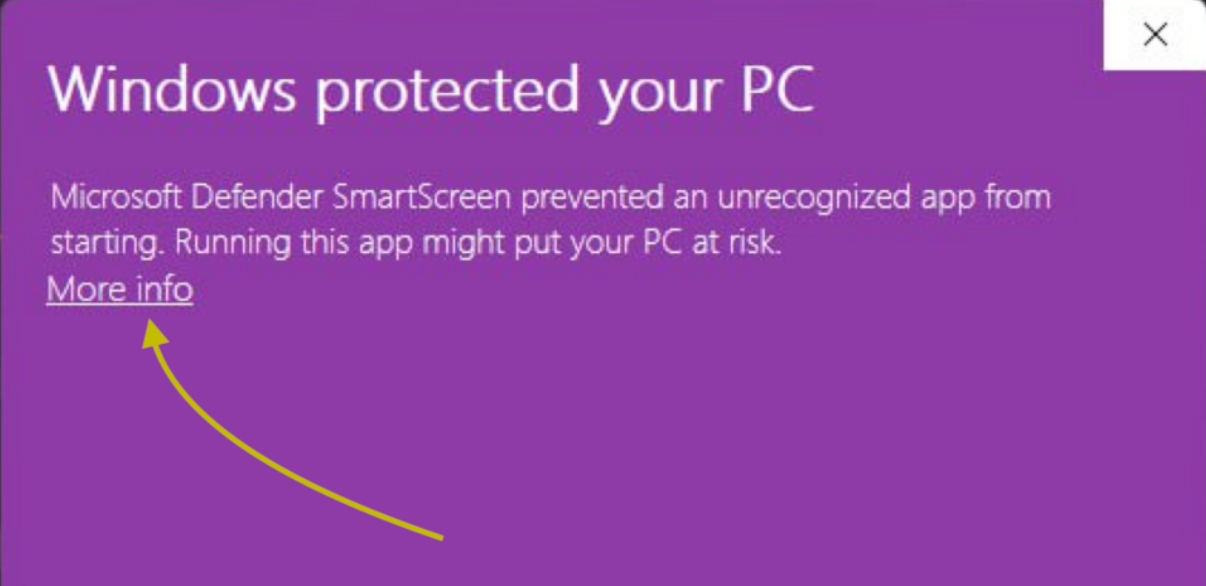

Scroll down and find OnlyMonsterBrowser → сlick on it, then toggle the switch to enable notifications:
Choose your preferred notification style:
Banners disappear automatically.
Alerts, stay until you dismiss them.


OnlyMonster Browser is optimized for Windows 10 and macOS 11.0 or later. If you're using an older version, please update your operating system to the required version.
Antivirus or firewall software may block the browser for the following reasons:
— Blocking executable files: Some antivirus programs mistakenly flag the browser as unsafe and block it.
— Disable your antivirus and firewalls: Temporarily turn off your antivirus and firewall to check if they’re causing the issue. For Windows users, ensure that Windows Defender Antivirus and Windows Firewall are also disabled. Follow these steps:
Open the Start Menu and search for Windows Security.
Click on Virus & Threat Protection.
Under Virus & Threat Protection Settings, click Manage Settings.
Toggle off Real-time protection to temporarily disable Windows Defender.
Open the Start Menu and search for Windows Defender Firewall.
Click on Turn Windows Defender Firewall on or off in the left panel.
Select Turn off Windows Defender Firewall for both Private and Public network settings.
After disabling the antivirus and firewall, try launching OnlyMonster Browser again.
If the sidebar loads but OnlyFans profiles do not display and the OnlyMonster loader keeps freezing:
Disable OnlyFans Proxy Bypass: Go to OnlyMonsterAI > Settings > Disable OnlyFans Proxy Bypass. (On Windows OS, right-click the monster icon to find the settings.)
This error indicates that the browser cannot reach required resources because the connection is unstable or restricted.
To fix this:
Check your internet connection.
Try using a VPN.
Disable antivirus, firewalls and ad blockers.
Restart the OnlyMonster Browser.
This is a 403 access error, meaning the application cannot access required data.
To resolve the issue:
Check that your account is a member of the agency.
Make sure your creator has an active subscription.
Update your role in Members → Edit → Update.
If there is an error related to proxies, you need to change the proxy settings:
Navigate to the Creators tab.
Open Settings.
In the Proxy Settings panel, click Switch IP or change the proxy to another country.
Restart the browser.
For more information on Proxy settings, please refer to the Proxy Management article.
If the problem persists, please contact our technical support team for further assistance.
When a new agency registers using your link, they receive an extended free trial for all profiles added within 10 days of registration.
The referral system includes two levels:
These are agencies that register using your referral link or code.
You receive 10% of all their balance top-ups for the next 365 days.
These are agencies invited by your Level 1 referrals.
You receive 2% of their balance top-ups, also for 365 days.
Referral rewards can be used in two ways:
Transfer to Agency Balance - Instantly move earned funds to your agency account balance and use them to pay for OnlyMonster services.
Cryptocurrency Withdrawal - Withdraw your referral earnings directly to your crypto wallet.
To invite an agency, you can either:
Copy your referral link and share it directly
Or send your referral code for manual entry
During the registration process, the invited agency must paste your referral code into the designated field.
Agencies that register using your referral link or code receive an extended 14-day trial for all creators added within 10 days of registration.
The Overview tab in the Referral system displays key stats:
Total Revenue - Lifetime earnings from all referrals (Level 1 and 2)
Withdrawn Funds - Total funds already withdrawn (agency balance + crypto)
Lvl 1 Referrals - Number of direct (Level 1) referrals
Lvl 2 Referrals - Number of indirect (Level 2) referrals
Lvl 1 Revenue - Earnings from Level 1 referrals
Lvl 2 Revenue - Earnings from Level 2 referrals
Current Balance - Referral earnings available for withdrawal
Withdraw Button - Click to access withdrawal options
To withdraw your referral earnings, click the Withdraw button in the Overview tab. A popup window will appear with two options:
Transfer to Agency Balance
Withdraw to Crypto Wallet
Withdrawal to your agency account is processed without any fees. The minimum withdrawal amount is $100.
To withdraw funds:
Enter the amount in the input field (or click "Max" to withdraw your full balance)
Click Submit
Your request will be marked as Pending and sent for review. After approval, the funds will be credited to your Agency Balance.
Once processed, the transaction will appear in your Billing History and be reflected in your agency balance.
If your request is stuck in “Pending” or gets canceled, contact our support team for clarification.
To withdraw funds to your crypto wallet, click the Withdraw button and select crypto wallet withdrawal. We do not charge any fees for this operation, however network fees may apply.
To complete the withdrawal:
Enter the exact withdrawal amount (minimum $100)
Choose a stablecoin: USDT or USDC
Choose the appropriate network from the dropdown menu
Enter your wallet address
Add comments if necessary
Click Submit
Funds are usually transferred within 2-3 business days.
For changes, corrections, or delayed transactions, please contact our support team.
In the General block you can view the following information:
Displays fan’s nickname and username in OF.
Click to select the fan’s country. The system will display its current time to help your chatters communicate more effectively with fans.
Click to enter the fan’s date of birth. The system will display the fan’s current age next to that field. Keep track of fans' birthdays to personalize your messages and strengthen the connection.
See how long the fan has been subscribed to your content.
Displays whether the fan is currently subscribed.
Displays the fan’s subscription rebilling status.
Check the last time when the fan was online. If a fan hides their online status, it will be displayed as “Hidden”.
Identify inactive fans by noting the day of their last response.
View when fans last read your messages, filtering out unresponsive fans or using hook phrases to re-engage them.
Displays the number of lists, to which the fan is related. Click to open the Collections → User Lists section in OF.
The Buying Power block allows you to view the fan's buying behavior. It consists of the following fields:
This feature rates a fan's purchasing potential on a scale of 0 to 5. It helps operators assess the likelihood of future purchases and optimize interactions with fans.
With this feature, you can view fan spending data either by individual creator or for your entire agency, providing a clear overview of their purchase history. The toggle enables you to effortlessly switch between Creator and Agency data, allowing you to monitor the following:
View the total amount a fan has spent on your content, helping you understand their spending habits;
Displays the fan’s average PPV amount spent;
Displays the fan’s average tip amount;
Observe the fan's most recent content purchase, helping you tailor your sales strategy.
This feature alerts you when a fan requests a chargeback, displaying the percentage of funds they’ve returned relative to their total spending. Powered by Big Data, the alert provides real-time insights to minimize risks and optimize your operations.
Click to open a pop-up window with the total PPV history of the fan.
Select the web source where the fan came from.
Automatically displays a tracking link if a fan has followed it.
Select the fan’s preferences from the drop-down list.
You can drag and drop the Fan’s Overview window, positioning it wherever you find it most convenient on the screen. Additionally, you can easily minimize or maximize the window as needed, allowing you to manage your workspace while interacting with fans efficiently.
Team members can also add specific notes about the fan, which can be used for more personalized and effective communication, further enhancing fan engagement and sales.
Our team is continuously working on enhancing data collection and fan filtering capabilities, allowing chatters to make more informed decisions and boost sales. These improvements will provide valuable insights for your marketing team, helping to optimize your promotional strategies and effectively target fans. Stay tuned for future updates as we strive to bring you even more powerful tools to elevate your fan engagement and revenue growth.


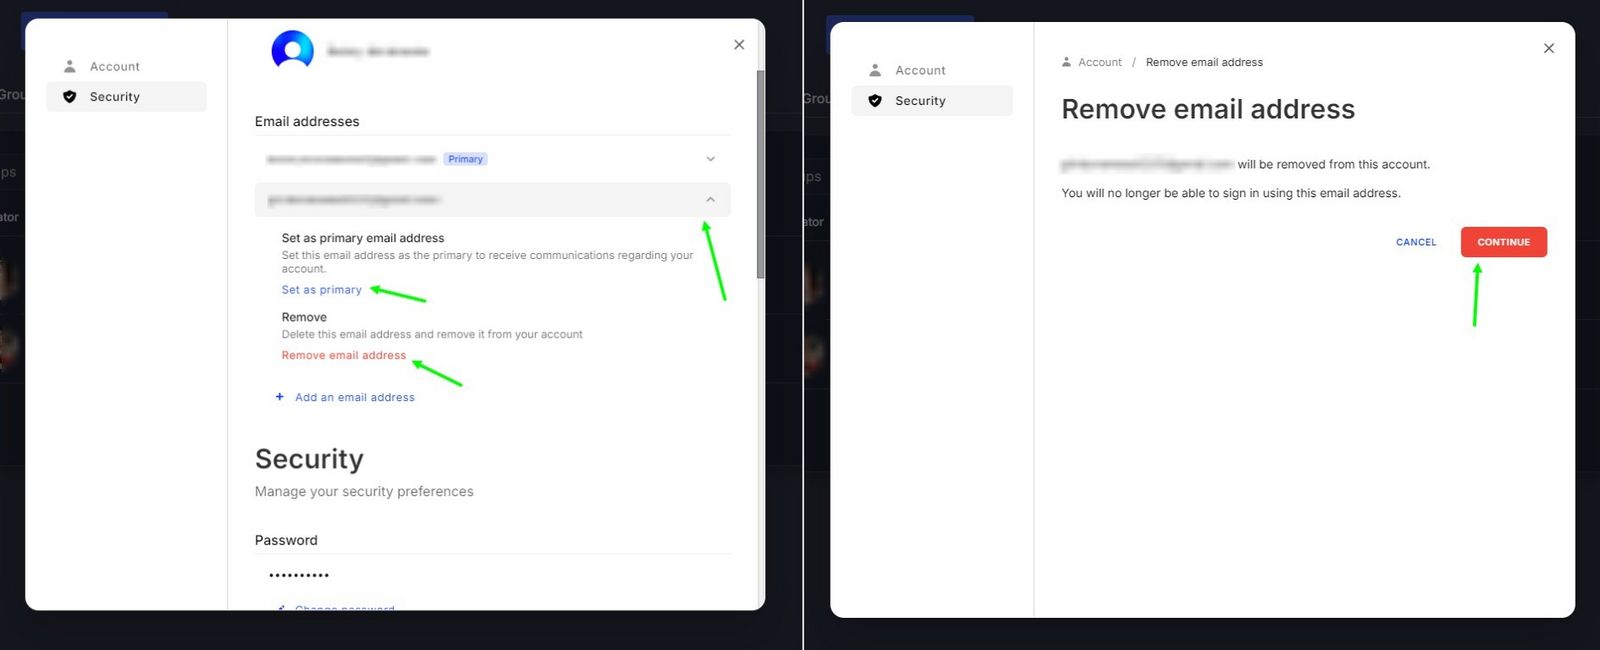
Message Guard is an AI-powered, multi-layered message protection system designed to help your team stay compliant with platform rules. It replaces the older Restricted Words feature with smarter detection, better customization, and complete logging of violations.
Maintaining compliance is critical to protect your agency’s reputation and avoid account bans or platform warnings. Whether violations happen by mistake or on purpose, Message Guard stops prohibited text content before it’s sent.
The system automatically scans all outgoing messages in real time.
If a message contains a prohibited word or phrase, the Message Guard:
Blocks the message before it’s sent
Logs the attempted violation for team managers to review
The Message Guard protection system uses multiple AI-powered layers to safeguard your accounts and ensure compliance. Each layer can be configured to match your agency’s specific needs and risk tolerance.
Bypass Protection - Detects hidden or altered versions of prohibited words (e.g. spaces, symbols, or intentional misspellings).
Red List - Blocks words and phrases that are likely to violate . This includes terms associated with illegal, harmful, or non-compliant content as inferred from the platform’s public policies.
Yellow List (OnlyMonster Curated Words) - A research-based list of high-risk terms identified through industry analysis and platform monitoring.
The Message Guard shows a real-time protection status based on which layers are currently active: :
Full Protection - All critical protection layers are enabled (recommended for maximum account safety)
Partial Protection - Some essential layers are disabled
Disabled - No Message Guard layers are currently active.
We strongly recommend keeping Full Protection enabled to minimize compliance risks and ensure safe team operations.
Locate the Message Guard Activate Now button and switch it ON to activate the Message Guard
Configure your desired protection layers based on your agency's needs
Important: Only one filtering system can be active at a time. You must choose between:
Legacy Restricted Words
Beta Message Guard
The selected system will handle all outgoing message filtering.
Bypass Protection is an AI-powered security layer designed to detect and block attempts to disguise prohibited words using character manipulation or formatting tricks, for example, using:
Special characters (e.g., "@" instead of "a")
Numbers (e.g., "3" instead of "e")
Extra spaces between letters
Mixed capitalization patterns
This layer uses machine learning to intelligently analyze and catch these obfuscation patterns in real time.
Why It’s Important
Blocks disguised violations before they are sent
Works independently of other word filters (OnlyFans, OM-curated, custom lists)
Should be enabled by default as a foundational protection layer
Note: Bypass Protection operates separately from other word lists. Even if a word doesn’t appear on your filter lists, this layer may block it if an obfuscated match is detected.
The Message Guard organizes restricted language into color-coded categories for clear visibility and flexible control. Each category includes optional subcategories.
This list includes the most dangerous terms that can trigger account penalties or bans. These are high-risk words that directly violate platform policies.
Recommendation: Always keep this category enabled.
A comprehensive list compiled by the OnlyMonster team based on research, platform violations, and ongoing policy changes.
This list is regularly updated to reflect the latest compliance standards and spot emerging violation patterns.
Recommendation: Strongly recommended to keep it enabled for up-to-date protection.
Create your own list of restricted terms that apply to your agency’s internal policies or brand requirements.
Use Cases Include:
Blocking competitor names
Restricting non-approved promo links
Enforcing tone-of-voice or brand language standards
The whitelist allows you to specify the words that should always be allowed, even if they appear in restricted categories.
Important Considerations
Layout-Sensitive: Keyboard layout matters (e.g., English "a" ≠ German "ä").
Language-Sensitive: Accents and special characters create distinct entries (e.g., "Resume" ≠ "Résumé").
Exact Match Required: Words must be entered exactly as they should appear, including capitalization and spelling.
When the Bypass Protection is Enabled
Whitelisted words must be spelled fully and correctly.
Obfuscated versions (with symbols, extra spaces, numbers, etc.) will not be recognized and may still be blocked.
The Message Guard organizes prohibited words into detailed subcategories for precise control.
Toggle All Categories - Use the Toggle All switch to enable or disable all subcategories at once.
Individual Category Selection - Turn protection on or off for specific subcategories, depending on your workflow and risk level.
Word List Preview - Click any subcategory to view the full list of restricted terms inside it.
This granular approach allows you to enable protection for critical categories while permitting your team to use words from less restrictive categories when appropriate.
When you click on a subcategory, you’ll see:
A complete list of the words included
An individual enable/disable toggle for that subcategory
This Message Guard layer is designed to protect your revenue by preventing fans from being redirected to outside platforms or contact methods that bypass your monetization flow.
The system can detect and block:
Website URLs - Prevents sharing external website links
Email Addresses - Blocks email contact information
Phone Numbers - Prevents phone number sharing
Crypto Wallets - Blocks cryptocurrency wallet addresses
You can enable or disable each protection type individually, depending on your agency’s needs. For most teams, we recommend enabling all blocks to:
Prevent unauthorized platform migration
Keep fans inside your revenue channels
Reduce risk of off-platform transactions and compliance issues.
The Message Guard maintains comprehensive logs of all blocked message attempts, providing managers with full visibility into violations and potential risks..
Each logged event includes:
Restricted Word/Phrase - The prohibited word or phrase that triggered the protection
Message - Displayed as truncated preview and full message on hover
Status - Current status of the log entry (e.g., "Detected")
Group/Topic - The category that flagged the word (e.g., "Direct contact", "Underage") with a red indicator icon
The logs interface includes powerful filtering options to help you quickly find specific events:
Accounts - Filter by specific creator accounts
User - Filter by team member
Date - Filter by date range
Group - Filter by protection method (Word categories, Bypass protection, Websites, etc.)
Each log entry displays one of the following statuses:
Detected - Word was blocked and logged
Archived - Log entry has been archived for record-keeping
To avoid clutter, you can archive old or resolved logs. Archived entries remain fully accessible but are hidden from the main view, allowing you to focus on recent or critical incidents.
When a message is blocked by the Message Guard, the user receives a real-time notification that the message wasn't sent.
The next Message Guard versions will offer more flexibility while maintaining security:
False Positive Marking - Mark a blocked word as incorrectly flagged to improve AI accuracy over time.
Contextual Protection - AI will assess the full message context, helping reduce false positives.
The Message Guard uses the same permission model as the legacy Restricted Words system. If a user had access to the old system, they retain it in the new Message Guard.
There are two types of permissions for accessing the Message Guard:
View Restricted Words
Can only view the Message Guard settings, contents, and logs. No editing allowed.
Edit Restricted Words
Can manage all Message Guard settings and options.
The permission system is a crucial element in managing your team effectively. Permissions assigned to a role determine which sections team members can access and what actions they can perform.
In this doc, you’ll find a brief description of permissions, categorized into four main areas.
This section includes permissions for standard OnlyFans functionalities.
Home: Allows team members to see the home feed, friends’ posts and stories.
Notifications: Allows team members to receive notifications from OnlyFans.
Messages: Provides access to view and engage in chats on the account.
Collections: Grants access to manage fan collections, including editing and clearing lists.
Vault: Allows access to the full gallery, including adding content to posts, stories, and categories.
Queue: Access to view and edit scheduled posts and messages.
Statements: Provides access to earnings, and chargebacks.
Statistics: Allows viewing of account stats such as engagement and performance.
My Profile: Access to view and edit the creator’s profile, including highlights.
Settings: Edit the profile, subscription pricing, safety settings, and notifications (safety-sensitive!).
Streaming: Permission to manage and run live streams (safety-sensitive!).
Cards & Banks: Allows viewing and editing of the creator’s banking information and wallet funds (safety-sensitive!).
Help & Support: Permission to contact OnlyFans support or explore Help Center resources (safety-sensitive!).
Logout Button: Allows members to log out of the OnlyFans account (safety-sensitive!).
Permissions related to chat and security functions.
Chat Hiding & Fan Blocking: Allows members to hide and clear chats or block fans (safety-sensitive!).
Unsend Message: Permission to unsend a message within 24 hours (safety-sensitive!).
Add New Media: Upload and send files from PC storage (safety-sensitive!).
This block contains permissions for the OnlyMonster Browser interface.
Dashboard: Access to the central analytics board, providing an overview of key metrics across the organization.
Chatter Metrics:
View Metrics: Access to Chatter Metrics dashboard - team performance statistics, including PPV sales, tips and message metrics.
View Transactions:
Additional OnlyMonster tools for enhancing the chatting experience and fan interaction.
Create Priority Mass Message: Create and send OnlyMonster priority messages.
AI Replies: Access to create AI replies using quick reply buttons.
Spell Checker: Allows messages to be checked for spelling mistakes.
Powerful OnlyMonster feature that enables seamless communication across language barriers. It supports more than 20 languages, helping chatters connect with fans in their native language instantly and
Note: Translation is available on OnlyFans, Fansly and Telegram.
Full Chat Translation automatically translates all messages in a conversation, including both past messages and new incoming ones.
Open any chat conversation.
Click on the Translation widget on the right-hand side.
Select the target language from the dropdown.
Toggle "Show Original Text" ON to display both original and translated messages side by side, or leave it OFF to show translations only.
Once enabled, the full conversation will translate immediately. All new messages will continue to appear in your selected language.
This feature lets you translate one message at a time, giving you full control over which content to translate. .
Open any chat conversation.
Click the Translation widget on the right.
Select your target language from the dropdown.
Click "Translate" beneath any message you want to translate.
This allows you to translate messages individually, giving you more control and enabling tailored communication for each chat message.
Outgoing Message Translation helps chatters instantly translate their messages into other languages before sending, ensuring clear and natural communication with fans worldwide.
There are two modes available:
Default Mode — Provides direct, grammatical translation. This mode works for a wide range of language pairs and ensures clear, literal meaning. Default mode delivers accurate, word-for-word translations that maintain the original structure and tone of your message. It is ideal for straightforward communication where precision and clarity are the priority.
Native Mode — This mode transforms your text into natural, conversational speech that sounds authentic and engaging. Instead of literal word-for-word translation, Native Mode creates messages that feel human, lively, and culturally appropriate. This mode prioritizes naturalness and emotional tone over strict grammatical accuracy, making your messages feel authentic and emotionally resonant.
Open any chat conversation.
Start by typing your message in the input field.
Click on the Translation widget.
Choose the source language (the language your message is written in) and the target language (the language you want it to be translated into).
Important Note: Selecting the correct source language is recommended. Auto-detection may occasionally misidentify semantically similar languages, which can affect translation accuracy.
Select your preferred translation (Default or Native, if available for your language pair) style and click "Paste" to apply and save the settings.
Once configured, your translation settings are preserved. Every time you use the Translation widget, your message will be automatically translated according to your saved preferences. These settings persist even after restarting OnlyMonster.
Alt + A - Translate with preview (keeps original text in input field for review)
Alt + S - Translate and auto-paste (immediately replaces input with translated text)
Option + A - Translate with preview (keeps original text in input field for review) Option + S - Translate and auto-paste (immediately replaces input with translated text) When using the preview shortcut (Alt/Option + A), your original text remains visible in the input field, allowing you to review the translation before pasting it. The auto-paste shortcut (Alt/Option + S) instantly replaces your original text with the translated version for immediate sending.
The AI Translator is also available when composing OnlyFans Mass Messages and Posts, enabling you to reach a global audience effectively. Use it to:
Translate campaign messages
Localize posts for international fans
Reach a broader audience with culturally relevant language.
All language pairs below are mutually translatable in both directions. These languages are available in Full Chat Translation, Individual Message Translation, and Default mode for Outgoing Message Translation.
Bulgarian
Czech
German
Greek
Native mode is currently availale for the following one-way translation pairs:
German → English
English → German
English → Spanish
English → French
At OnlyMonster, we offer a powerful toolset for creator management — backed by a transparent, flexible pricing model that scales with your business.
OnlyFans pricing is based on the monthly earnings of each connected creator. As a creator earns more, the data and server resources required increase — so our pricing reflects that growth in value.
Plan Duration: 30 days per subscription
Pricing Model: Dynamic — based on the creator’s past 30-day earnings
No Recurring Billing: You choose to pay upfront for 1, 3, or 6 months
You can estimate the cost of services in advance using our.
You only pay after connecting a creator through the OnlyMonster Browser.
Once connected, we analyze the creator’s earnings from the last 30 days to determine the correct pricing tier.
If you're using a free trial and want to upgrade:
Click on your current plan indicator
Or go to the creator’s settings and select the desired plan.
Paying for 3 or 6 months in advance lets you lock in your current rate.
Even if your creator’s earnings increase during that time, your price remains unchanged — no retroactive adjustments or extra charges.
For other supported platforms, we use a fixed-price model. Each connected creator on these platforms is billed at a standard rate of $30 per month.
Plan Duration: 30 days per subscription
Available Plan Length: 1-month plans only
Pricing: Fixed — not affected by creator income
We accept:
Credit cards
Cryptocurrencies
For a detailed overview of all available payment methods and step-by-step instructions, please visit our
If you encounter any issues or want to pay using a different method, don't hesitate to reach out to our support team. We're here to assist you and make your experience with OnlyMonster as smooth and efficient as possible.
If you have any questions, please don’t hesitate to contact us:
Telegram: @mnstrvibe
Or.
In this guide, we will walk you through the process of adding funds to your agency balance, renewing subscriptions, and purchasing additional AI credits on OnlyMonster.
Payment can be made with cryptocurrency or bank card.
Making payments and extending subscriptions, as well as purchasing AI credits on OnlyMonster can be done according to the following scheme:
Add funds to your agency balance using a credit card or cryptocurrency.
Renew creator plans by selecting the appropriate plan and making payment or Purchase additional AI credits when needed.
A red notification appearing in the Billing tab indicates that a renewal is due. The counter shows the number of accounts whose plan is about to expire. The notification appears 3 days before the plan expires.
Before extending plans or purchasing additional AI credits, funds need to be credited to your agency balance.
Navigate to the - Add Funds To Your Balance.
Specify the exact amount that will be added to your Agency Balance.
Choose the preferred Payment method: Credit Card or Cryptocurrency.
Enter the required card details (card number, expiration date, CVV, and other details required by the payment system).
After payment is processed, you’ll receive an invoice by email.
Select your preferred cryptocurrency and network.
Copy the provided payment address or scan the QR code.
Open your cryptocurrency wallet and complete the transaction.
It may take up to 10 minutes for funds to be credited to your account.
Once your agency account has sufficient funds, you can extend the subscription plans for your creators.
In the Billing tab, go to the Subscriptions section.
Locate the creator whose plan you want to renew.
Choose a renewal duration: 1-month, 3-month, or 6-month
A plan marked as green indicates you've selected that creator for renewal. If it’s not marked greed, the plan will not be renewed.
Click Make Payment.
In case additional AI credits are needed, you can easily purchase more through the Billing tab:
Click Purchase More AI Credits.
Select the number of credits you want to purchase.
Confirm your purchase and proceed with payment.
Once processed, your AI credits will be automatically replenished.
If you encounter any issues with payments (for example, if funds aren’t appearing in your account), here's what to do:
For Credit Card Payments: Check your email for a receipt from the payment system, and contact our support.
For Cryptocurrency Payments: If your funds haven’t appeared, share the Transaction ID (TxID) with our support for faster assistance.
The Priority Mass Messages feature lets you send messages to a large number of fans, ensuring higher visibility and engagement by placing them in the Priority tab instead of the "All" tab.
When you send a mass message on OnlyFans, it typically appears in the "All" tab, where fans may overlook it—especially if they follow multiple creators. Priority Mass Messages, however, stand out.
Fans receive a notification in the Priority tab.
If OnlyFans notifications are enabled, they will also get a push notification.
This makes Priority Mass Messages significantly more effective for engagement compared to standard mass messages.
The sending delay sets the interval (in seconds) between each message being sent. Adjusting this delay helps:
Reduce device load
Avoid the "Allow 3 seconds" error (which occurs if OnlyFans limits are exceeded)
Up to 450 fans: 3 seconds
More than 450 fans: at least 10 seconds
You can adjust this setting based on the number of fans you are messaging to optimize performance.
Make your messages feel more personal using name placeholders:
{name} – Inserts the fan’s chosen display name.
{displayName} – Uses a custom name you’ve assigned to a fan.
{displayName|name} - Inserts the fan’s chosen display name if a custom name isn't available.
{displayName|my friend} – If the fan has no custom name, "my friend" will be used instead.
Add personality to your messages with a wide range of emojis and search functionality. Click the emoji icon again to close the emoji window. To close the emoji window, click on the icon again.
Choose from a variety of AI Assistant modes tailored to different messaging needs.
For a complete breakdown of AI features, check out our .
You can attach both free and paid media to mass messages:
Paid media converts the message into a PPV (Pay-Per-View) message.
Free media can be sent as-is or act as a preview for your PPV content.
Messages will be sent only to fans who are online at the moment of collection.
Fans with a hidden online status or expired subscriptions will not be included.
Choose specific recipient lists to include or exclude from your message.
If a fan appears in both the included and excluded lists, they will not receive the message.
If you’ve selected "Send to Online Fans Only," you can only exclude lists, not select new ones.
To avoid disrupting ongoing chats, set an exclusion period (1–12 hours) for fans you’re actively chatting with. .
An active chat is any conversation where the fan has recently sent a message.
All sent and deleted mass messages are stored in the Priority Mass Messages History section on your creator page. Messages only appear in this section after they are deleted.
Pause & Resume: You can stop sending messages at any time and resume later.
Unsend Within 24 Hours: Messages can be unsent within 24 hours of sending.
Local Storage: Mass messages are stored locally in your device’s cache.
You can close the tab, but the browser must remain open. Closing the browser may delete the cache, causing the message to disappear.
Device-Specific Visibility: Mass messages and settings are only visible on the device where they were created.
Lost Messages: If a mass message disappears from the creation menu, it was deleted from the cache and cannot be recovered or unsent.
Reducing Device Load: Increase the sending delay if message collection or sending is affecting performance.
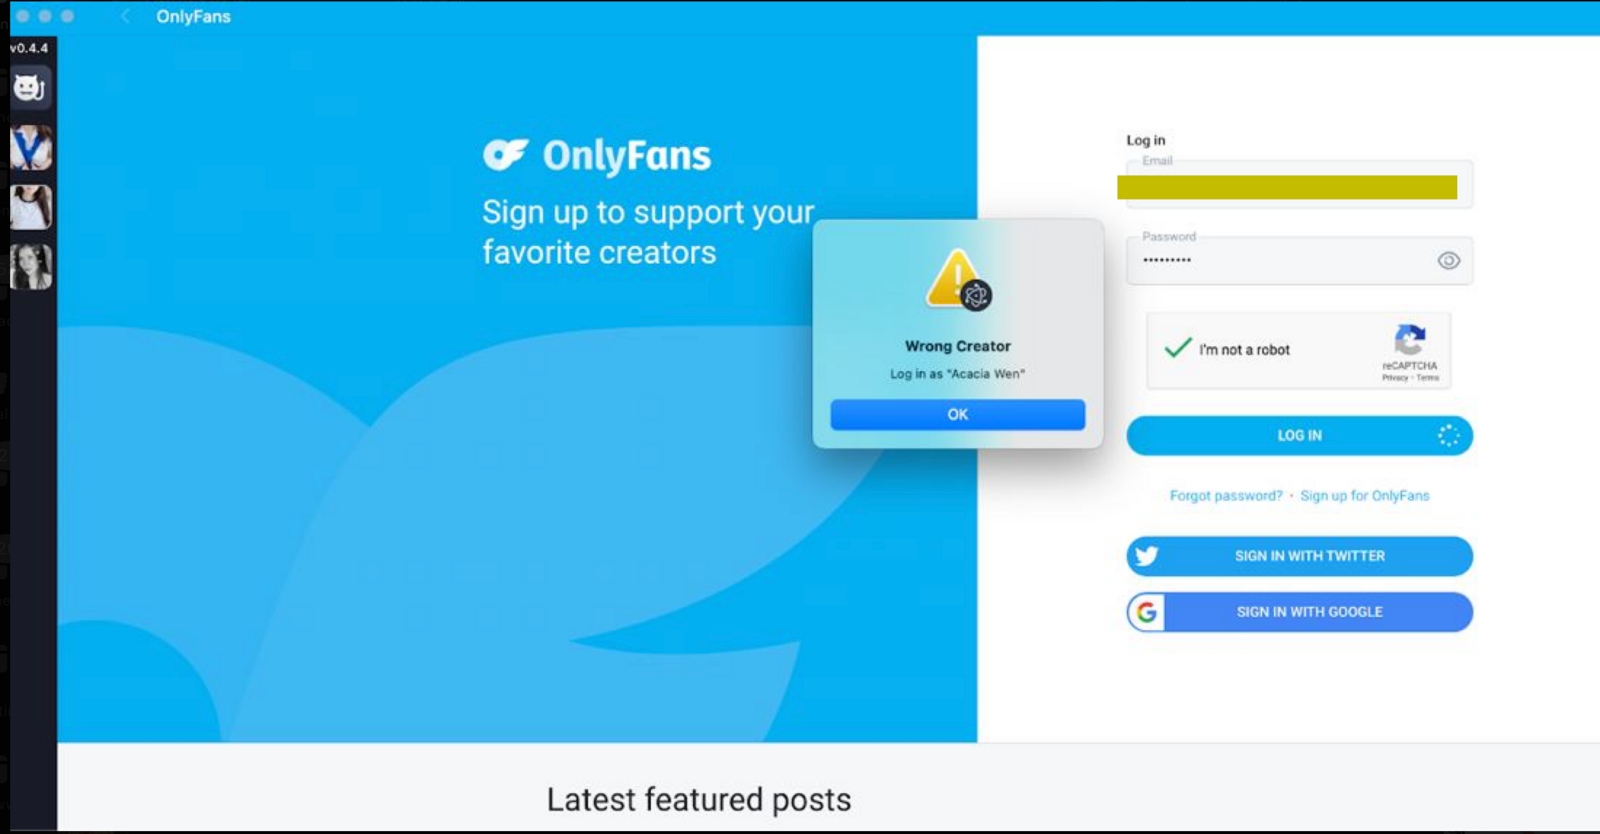
Below is a complete breakdown of permissions available within the Telegram integration. Each permission controls access to specific features and actions within connected Telegram accounts.
Settings: Allows access to modify Telegram account settings such as name, profile picture, language, and notification preferences.
Smart enhancement features of OnlyMonster AI, designed to make your chat interactions more natural and fluent, as if you were typing quickly on your phone.
Download Media: Permission to download media files from the Vault.
Delete Media from Vault: Permission to delete media and categories in the Vault (safety-sensitive!).
Add stories: Create and delete stories.
Create New Post: Create and delete posts.
Create Mass Message: Send OnlyFans mass messages.
Promotions: Permission to create and manage promotion campaigns (safety-sensitive!).
Edit Transactions: Enables assigning transactions to agency members. Enables both View Metrics and View Transactions permissions.
Chatter shifts: Allows your team members to use a dedicated calendar to schedule employees’ work hours.
View shifts: Only Viewing chatter shifts.
Edit shifts: Create and edit chatter shifts.
Creators:
Connect Creator: Permission to add creators.
Groups: View and manage groups of creators, including adding/removing creators from groups.
Creator Settings:
Assign Creators: Manage team members’ access to creator accounts.
Proxy Settings: Manage settings for proxies, time zones, emoji customizations, and chat color splitting.
Creator Insights: In-depth analytics for creator performance.
Traffic Metrics: Analytical tools for tracking and trial links.
Auto-Renew Promotion: Access to the fan engagement tools for creating auto-renewing promotions.
Auto-Follow Expired: Manage auto-subscription settings for expired fans.
AI Assistant Settings: AI credits status, Status reply, and quick reply buttons customization.
Media Hub:
View Media: Access to Media Hub files in the OnlyMonster Browser panel.
Upload Media: Allows uploading media to the Media Hub panel using the “Upload Media” button (safety-sensitive!).
Edit Media: Permission to create and rename folders, edit descriptions, tags, preferred prices, link and unlink folders.
Delete Media: Allows the users to delete files and folders in the Media Hub panel.
Message Guard:
View Message Guard: Permission to view Message Guard tab in OnlyMonster Panel.
Edit Message Guard: Allows for adding and editing Message Guard Settings.
Members:
View Members: Permission to view members.
Edit Members: Edit member information such as tags, notes, assign and revoke access to creators.
Remove Members: Permission to remove members from the agency.
Roles:
View Roles: Access to view and manage roles.
Edit Roles: Manage role permissions and assign roles to team members.
Assign Roles: Assign roles to team members.
Agency: View and edit agency information such as time zone and ID.
Billing: Access to billing, plan renewals, AI request usage, and billing history.
Buying power: Enables access to the Buying power (Fan Scoring) feature.
Stories: Grants the ability to view and post Stories from the Telegram account.
Contacts: Provides access to the account's contact list.
Modify Chat Folders: Enables creating and editing chat folders to organize conversations.
Create Chats & Channels: Allows starting new conversations and creating Telegram channels or group chats.
Delete Chats: Allows deleting individual conversations permanently.
Archive Chats: Enables archiving chats.
Hide Archived Chats: Allows hiding the archived chat folder from view.
Hide Chat with Telegram: Hides the system chat with Telegram (used for service messages and notifications).
Hide Chat with Saved Messages: Hides the "Saved Messages" personal chat.
View Usernames: Allows viewing Telegram usernames of other users.
View Phone: Grants access to view users' phone numbers (if publicly available).
Block Users: Enables blocking contacts or users.
Search Users: Allows searching for users within Telegram.
Create New Contacts: Grants permission to add new users to the contact list.
Edit Contacts: Allows editing or deleting saved contacts.
Delete Messages: Grants permission to delete individual messages within chats.
Forward Messages: Allows forwarding messages to other chats or contacts.
Schedule Messages: Enables scheduling messages to be sent at a later time.
Mute Notifications: Allows muting or unmuting notifications for specific chats.
Send Media: Grants the ability to send photos, videos, documents, and other media files.
Send Gifts: Allows sending virtual gifts (if supported).
Record Audio: Enables recording and sending voice messages.
Make Calls: Grants permission to make voice and video calls via Telegram.
All attempts are tracked in detail, allowing for transparency and follow-up coaching if needed.
Whitelist - Add exceptions to allow specific words or phrases that would otherwise be blocked.
Additional AI Protection - Prevents messages that redirect fans to outside platforms (e.g., social media links or payment sites), helping avoid external traffic violations.
User - The team member who attempted to send the message
Account - The creator's account on which the violation attempt was made
Type - Message type identifier
Date - Date and time of sending the message in which the violation attempt occurred
Topic - Filter by specific topic within categories
Type - Filter by message type


Click "Enable Translation".
Finnish
French
Croatian
Hungarian
Italian
Dutch
Norwegian
Polish
Portuguese
Romanian
Russian
Slovak
Slovenian
Spanish
Swedish
Tagalog
Thai
Ukrainian
Ukrainian → English


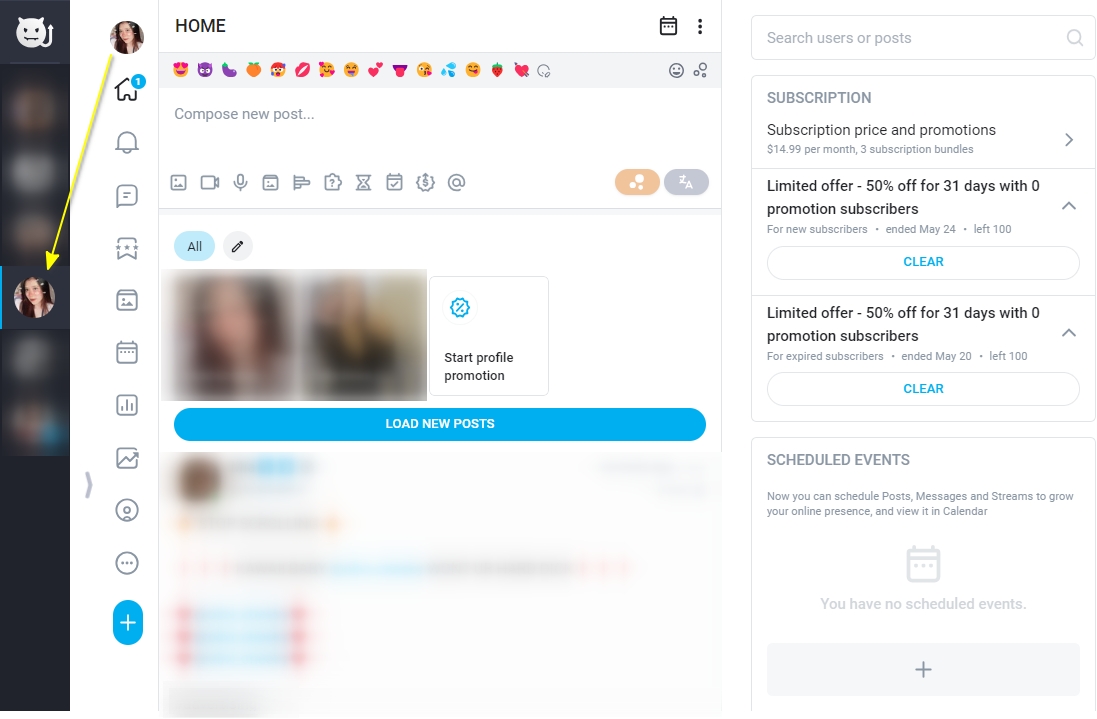
Pro Scaling
$5,000 – $10,000
$50
$135 (Savings: $15)
$240 (Savings: $60)
Pro Advancing
$10,000 – $20,000
$100
$270 (Savings: $30)
$480 (Savings: $120)
Pro High-Earner
$20,000 – $30,000
$150
$405 (Savings: $45)
$720 (Savings: $180)
Pro Star
$30,000 – $50,000
$200
$540 (Savings: $60)
$960 (Savings: $240)
Pro Superstar
$50,000 and above
$250
$675 (Savings: $75)
$1,200 (Savings: $300)
Regular LoyalFans
LoyalFans
$30
Regular Subs
Subs
$30
Regular Telegram
Telegram
$30
Pro Starter
$0 – $2,500
$30
$81 (Savings: $9)
$144 (Savings: $36)
Pro Growing
$2,500 – $5,000
$40
$108 (Savings: $12)
Regular Fansly
Fansly
$30
Regular Fanvue
Fanvue
$30
Regular Mym
Mym
$30
Regular Reddit
$192 (Savings: $48)
$30


Fluid Conversations: Quickly remove commas from your message. This lends a more conversational, uninterrupted flow to your text, similar to natural speech patterns.
Simplified Messaging: Sometimes, a plain text message is more appropriate. Remove all emojis from your message easily to suit the tone of the conversation.
Authenticity in Brevity: Modify your messages with shorthands. This feature is great for creating quick, to-the-point replies that feel genuine and spontaneous.
Personal Touch: Choose a writing style that best suits your or the creator's personality. This adds a layer of personalization to your interactions, making them more engaging and authentic.
These smart enhancements are here to elevate your OnlyMonster AI experience, making your chats more natural, efficient, and tailored to your unique style.


An advanced feature that helps you reply faster in OnlyFans chats while keeping your style. It creates ready-to-send responses from recent messages and offers 10 modes for different chat scenarios.
AI Suggestions analyzes your chat history (up to the last 15 messages) and generates tailored responses that:
Continue the natural flow of your conversation
Mirror your messaging style precisely, including message length, emoji use, and punctuation patterns
Match the current tone and intimacy level based on the chat history
Provide one ready-to-send message with no extra labels or meta-text
Simply select the mode that fits your goal, and the AI will generate an appropriate response based on your conversation context.
What it does: Continues the exact flow of your chat with short, natural responses that match your style, punctuation, and emoji use.
Best for: Maintaining conversation momentum with quick, authentic replies that feel natural.
Key features:
Mirrors your style precisely
Keeps the conversation moving
No greetings, topic shifts, or meta-text
Based entirely on your chat history patterns
What it does: Generates one playful, context-sensitive question or mini-challenge anchored to the fan's last message to re-hook their attention
Best for: Re-engaging fans and sparking interaction when the conversation slows down.
Key features:
Anchored to the fan’s last message
Fun, relevant, and specific — never generic
No interview-style or hypothetical questions
Designed to spark immediate interaction
What it does: Provides a bashful, naive, or modest response that contrasts with the current chat tone.
Best for: Adding emotional variety, creating contrast, or cooling down intensity
Key features:
Shows expressive innocence with variety
Keeps the thread moving forward
Uses "double-layer innocence" in NSFW contexts
Avoids infantilization or repetitive phrases
What it does: Creates cheeky, bold, and unpredictable hooks that keep fans engaged without going fully NSFW.
Best for: Teasing and keeping the chat fun, light, and unpredictable.
Key features:
Interactive, specific, and magnetic
Strong, engaging endings
No paraphrasing or bland small talk
What it does: Smoothly escalates or intensifies NSFW tension based on the fan's vibe and current chat flow.
Best for: Naturally building intimacy when the conversation is heating up
Key features:
Matches the current intensity level
"Show, don't ask" approach
Escalates naturally without abrupt jumps
Reads subtle cues and bridges naturally into sexting
What it does: Generates non-specific teases to trigger purchases — without naming content formats.
Best for: Monetizing the conversation when you're ready to sell content
Key features:
Uses sensory and emotional triggers
Creates urgency and exclusivity
Doesn’t mention formats (photo, video, call, etc.)
Works with any type of content you offer
The following modes are still available for backward compatibility but will be merged or removed soon:
Overlaps with Engage; often produces generic questions. Will be merged into Engage (Questions).
Overlaps with Upsell; seen as mass promotion. Will be merged into Upsell (Sales/Unlock).
Short messages duplicating Quick Reply/Playful functionality. Will be removed soon.
Meme-like "wake-up" nudges similar to Quick Reply. Will be removed soon.
These modes overlap with the updated ones and can create confusion. The refreshed modes provide clearer options and better results.
To get the best results from AI Suggestions, ensure there are at least 5 incoming messages in your chat history. This allows the AI to:
Understand the conversation context
Mirror your style accurately
Match the current tone and flow
Generate relevant, natural responses
Note: The AI prioritizes the latest fan message and immediate thread to keep responses contextual and timely.
Choose the right mode for your goal:
Need a natural continuation? → Quick Reply
Want to re-engage attention? → Engage (Questions)
Need emotional variety or cooldown? → Innocent
Want to tease without going NSFW? → Playful
Provide enough context: The AI works best with 10-15 recent messages in chat history. More context = better, more personalized suggestions.
Switch modes if needed: If a mode feels repetitive, try a different one or add more messages to the thread before generating again.
Use as-is: The output is ready to send immediately with no labels or meta-text — just generate and send.
Seamless flow: Updated modes focus on continuing the current thread without topic resets or generic openings.
Style matching: The AI mirrors your recent messaging patterns, including length, emoji use, and punctuation.
Natural progression: Tone and intimacy follow the conversation's current level — the AI avoids sudden shifts or intensity changes.
One message output: Each mode produces a single, ready-to-send message with strict length constraints optimized for engagement.
Personalization Options: All AI Modes can be customized to suit your unique needs. Go to the section in the OnlyMonster to tailor these settings to your preference.
If something feels off:
Check your chat history: Make sure you have at least 10-15 messages for proper context.
Check the mode: Make sure it matches your goal.
Review conversation flow: The AI mirrors your recent style. Check your last few messages to see the pattern it's following.
Try a different mode: Sometimes another mode fits the situation better.
Need help? When reporting issues to support, include screenshots of your last 10-15 messages and AI mode used so we can understand the context and assist you better. The AI's decisions are directly tied to this conversation history.
Auto Messages is a cloud-based OnlyMonster feature that allows you to automatically send delayed Welcome Messages for new subscribers and real-time Messages for Fans Who Come Online. A system of advanced filters allows you to fine-tune delivery and improve fan engagement.
On the main Auto Messages page, you can select a Creator and view all Auto Messages campaigns launched for that Creator.
To create a new Campaign, first select the Creator and click the New Campaign button.
Ready to escalate intimacy? → Spicy
Time to monetize? → Upsell (Sales/Unlock)


Delayed messages for new subscribers:
You can create one Welcome Message per Creator to be sent after a new subscription.
Messages for fans who come online:
You can create multiple messages triggered when fans appear online.
For each campaign, you can configure a flexible delay. The message will be sent within a selected time range, which helps maintain a natural and smooth conversation flow.
The following information is displayed in the campaign overview:
Message - The content of the message
Status - Current state of the campaign:
Active - the campaign is running and messages are being sent based on the selected filters
Paused - the campaign is temporarily stopped. Messages are not being sent but can be resumed at any time.
Archived - The campaign is inactive and permanently disabled. Once a campaign is archived, this action cannot be undone.
Status Change - You can change the campaign status by clicking on Active or Paused.
Trigger - Defines the type of auto message:
Welcome Message - Sent to new subscribers
Online Message -Sent when fans appear online
Audience Filter: Displays selected filters for targeting, including sending conditions and exclusion lists.
Sent - Total number of messages successfully sent.
Unsent - Number of unsent messages.
Price
Purchases
Earnings
Created by - The name of the team member who created the Campaign
You can set up one Delayed Welcome Message per Creator. This message will be sent to first-time subscribers.
To create a Welcome Message, select Creator from the dropdown and click New Campaign, then choose Welcome Messages.
You are now redirected to the Campaign Settings tab, where you need to configure the campaign settings.
In the Apply Action field, you can select a flexible delay within which the message will be sent once the trigger activates.
Flexible delay values:
Minimum - 1-3 minutes;
Maximum - 30-60 minutes.
You can also set the specific time range during which the messages are allowed to be sent.
To configure:
Toggle the Time Range option ON
Set your preferred start and end time
Choose the time zone:
UTC
Agency Time Zone
You can enable the Auto-Unsend feature within the Apply Action field.
When creating a Welcome Message campaign, you can apply the following filters to target your audience more precisely:
Filters for Welcome Messages:
Spent on an Agency - Target fans who have previously spent money on other accounts within the agency. Set both minimum and maximum spending amounts (both fields are required).
Purchased from Agency - Filter fans based on the recency of their purchases from other agency models. Options available:
Purchases made less than X days ago.
Purchases made more than X days ago.
Buying Power filter - Target fans based on their assigned Buying Power score (range: 0 to 5).
Welcome messages use a fixed 24-hour "Active chats" period and can not be customized. If there's an active conversation with a new subscriber within this 24-hour window, the Welcome message will not be sent.
Enter the Welcome Message text in the input field.
Click the plus (+) icon to open the emoji panel and insert emojis into your message.
To insert the fan's name or custom name:
Click the Dynamic Name button.
Choose between the following options:
Custom Name - Custom name you've manually assigned to the fan (if available)
Fan's Name - The name from the fan's profile (if available)
Fan's Name → Custom Name - Uses the fan's name first. If unavailable, uses the custom name.
Custom Name → Fan's Name - Uses the custom name first. If unavailable, uses the fan's profile name.
First Word from Name
When choosing Fan's Name, enable the toggle to insert only the first word (e.g. first name only) into the message.
Fallback Name
If neither a fan name nor a custom name is available, set a Fallback Name. This name will be used to personalize the message instead.
You can enhance your auto messages with both free and paid media, as well as paid text messages.
To include free media in your message:
Navigate to the Free Media section
Click the plus (+) button to add media
Select content from the Vault.
To create messages with paid media content:
Enable the Paid Media toggle
Enter the price in the Price field
Click the plus (+) button in the Paid Media section to add content
Use a dot (.) for decimal prices (e.g. 3.99, not 3,99).
You can also assign a price to text-only messages:
Enable the Paid Text toggle
Enter the desired price in the Text Price field.
Before launching the campaign:
Carefully review all fields and settings.
Once the campaign is started, neither the message nor the settings can be edited.
When everything is verified, click Start Campaign to launch.
Unlike welcome messages (limited to one active campaign per Creator), you can create multiple auto-messaging campaigns for fans appearing online, each with unique filters and settings to better engage different segments of the creator's active audience.
Once a fan receives a message from a specific campaign, they will not receive additional messages from the same campaign when they appear online again.
To continue messaging fans who come online repeatedly, create separate campaigns with different filters and settings.
If a fan qualifies for multiple active campaigns at the same time, the system will send only one message from one campaign per trigger activation.
When multiple campaigns are created, priority will be given to the most recently created campaign.
In the Apply Action field you need to select a flexible delay within which the message will be delivered (after the trigger activates).
Flexible delay values:
Minimum - 1-3 minutes;
Maximum - 30-60 minutes.
You can define the time window within which the messages are allowed to be sent.
To configure:
Toggle the Time Range option ON
Set the start and end time
Choose the time zone:
UTC
Agency Time Zone
You can enable the Auto-Unsend feature within the Apply Action field.
You can choose to resend the same message to a fan after a set period.
To configure:
Toggle the Resend Message option ON
Set the number of days before the message can be sent again
Minimum: 1 day
Maximum: 30 days
When setting up Auto Messages for fans appearing online, you can apply a range of filters to fine-tune your audience targeting:
Spent on a Creator between - Target fans based on how much they have spent on the Creator's page. When activating this filter, you need to specify both minimum and maximum spend.
Spent on Agency between - Target fans based on their total spending across all models connected to the agency. When choosing this filter, you need to specify both minimum and maximum spend.
Purchased from Creator - Filter fans based on recent purchases from the Creator:
Purchases made less than X days ago.
Purchases made more than X days ago.
Purchased from Agency - Filter fans based on recent purchases from any agency model:
Purchases made less than X days ago.
Purchases made more than X days ago.
Buying Power - Filter fans based on their assigned Buying Power score (range: 0 to 5).
Two options are available for excluding fan categories from the campaign:
Active Chats toggle - allows for excluding active chats (messages sent by the model only are taken into account). Minimum value - 15 minutes, maximum - 24 hours.
Exclude fan lists - you can select any number of exclusion lists.
Exclude lists are refreshed every 30 minutes
Enter your message in the input field.
Click the plus (+) icon to open the emoji panel and insert emojis.
To insert the fan's name or custom name:
Click the Dynamic Name button.
Choose between the following options:
Custom Name - Custom name you've manually assigned to the fan (if available)
Fan's Name - The name from the fan's profile (if available)
Fan's Name → Custom Name - Uses the fan's name first. If unavailable, uses the custom name.
Custom Name → Fan's Name - Uses the custom name first. If unavailable, uses the fan's profile name.
First Word from Name
When choosing Fan's Name, enable the toggle to insert only the first word (e.g. first name only) into the message.
Fallback Name
If neither a fan name nor a custom name is available, set a Fallback Name. This name will be used to personalize the message instead.
You can enhance your auto messages with both free and paid media, as well as paid text messages.
To include free media in your message:
Navigate to the Free Media section
Click the plus (+) button to add media
Select content from the Vault.
To create messages with paid media content:
Enable the Paid Media toggle
Enter the price in the Price field
Click the plus (+) button in the Paid Media section to add content
Use a dot (.) for decimal prices (e.g. 3.99, not 3,99).
You can also assign a price to text-only messages:
Enable the Paid Text toggle
Enter the desired price in the Text Price field.
Before launching the campaign:
Review all fields and settings carefully.
Once launched, neither the message nor campaign settings can be edited.
When ready, click Start Campaign to launch.
After launch, the campaign will appear in the Active status within the campaign list.
Every creator and agency understands the importance of tracking traffic. It’s not just about counting clicks; it’s about understanding user behavior, the quality of traffic sources, optimizing content


Holistic View: See aggregated metrics on top for both total and average numbers. Understand the broader patterns, not just isolated data points.
Detailed Fan Insights: View the list of fans that made purchases, gaining a more precise understanding of your audience's behavior.
Shareable Tracking Pages: A unique feature allowing you to create a page with select tracking links to share with non-OnlyMonster users, like those aiding with traffic flow.
Navigate to the Traffic Metrics Tab: This is where all your tracking and trial link data resides.
Input Traffic Costs: To see metrics like profit, CPC, and more, input the cost associated with generating that traffic.
Analyze Metrics: Use the data to influence decisions, adjust strategies, and maximize revenue.
View Deleted Links: Worried you lost valuable data by deleting a link? Don't stress. We've stored all deleted links for your convenience.
Share Insights: If you wish to share specific tracking data with someone, use our shareable tracking pages.
Understand the dynamics of your free trials, ensuring they're effectively converting fans.
Differentiate New vs. Old Fans: In Trial Links Metrics, you can categorize and differentiate between new subscribers and old fans, giving you a clearer view of how your content and trials affect different segments.
Clicks (Tracking Links): Total number of unique and non-unique clicks on the tracking link. Measures the level of engagement with the link.
Claims (Trial Links): Number of claimed trials. Represents the effectiveness of the trial link in encouraging users to claim a trial.
Fans: Total number of fans acquired via tracking link. Tracks fan acquisition performance.
Cost: Manually entered cost associated with the promotion or campaign. Used to calculate profitability and efficiency.
Earnings: Total net revenue from all fans, including subscriptions, acquired via the tracking link. Represents total income generated from the campaign.
Profit: Net profit, calculated by subtracting the cost from the earnings. Indicates the overall financial success of the campaign.
CPC (Cost Per Click): Calculated by dividing the total cost by the total number of clicks. Measures the cost-efficiency of attracting visitors to the link.
EPC (Earnings Per Click): Calculated by dividing the total earnings by the total number of clicks. Reflects the revenue generated from each click.
CPF (Cost Per Fan): Calculated by dividing the total cost by the total number of fans. Assesses the cost-effectiveness of fan acquisition.
ARPF (Average Revenue Per Fan): Calculated by dividing the total earnings by the total number of fans. Provides insight into the value of each acquired fan.
Spenders: Total number of unique fans who have made any transactions using this account. Indicates the number of revenue-generating fans.
Conversion: Percentage of clicks that resulted in a fan subscription. Measures the effectiveness of the link in converting visitors into fans.
ROI: Percentage of return on the total investment, calculated by dividing the net profit by the total cost and multiplying by 100. Assesses the profitability and overall success of the campaign.
The Income and Fans columns provide detailed insights into the performance of a specific link.
This section features a chart displaying the income generated by fans acquired through the link.
View detailed stats for each fan acquired through the link. The data is organized by various actions, including subscriptions, tips, post and purchases via messages and spending on streams.
Stats can be sorted by: total spent, date, number of purchases.
This functionality provides a comprehensive view of how fans engage and spend, enabling you to optimize your strategy for better results.
Tracking Links: Navigate to Creator's Settings → Profile → Tracking Links.
Trial Links: You can find these under Creator's Settings → Subscription price and bundles.
Traffic Metrics are about giving power back to the creators and agencies. It’s about understanding your audience, refining strategies, and ensuring that every effort you put into your content yields the best results.


Auto-Messages/Priority Mass Messages: Updated the media upload flow for the campaign creation. You can now use media uploaded directly to the Vault when creating campaigns.
Priority Mass Messages: Added support for using platform lists when sending priority campaigns.
Dynamic Lists: Fixed an issue where some lists were not refreshing automatically during the 6-hour update cycle.
Traffic Metrics: is now available.
Platform MyM - Creative Translator: Creative Translator is now available for the MyM platform.
Translator - Danish Support: Added Danish language support in the Translator.
Fan's Overview Widget - Timezones: Added missing timezones (locations) to the widget.
Date Picker: Enhanced timerange component in Legacy Control Panel (Dashboard, Chatter Metrics, Creator Insights) - end date now uses 59 seconds.
Platform MyM: Added support for the Blur functionality on the MyM platform.
Delete Chats Permission: Users without the Chat Hiding & Fan Blocking permission can no longer delete chats through bulk selection.
Sidebar Interaction: Expanded the clickable area for the sidebar collapse/expand toggle.
Priority Mass Messages: Added a toggle switch between Sent/Unsent mass messages.
Blur Icon: The blur icon now visually reflects its state. A crossed-out icon indicates that blur is enabled.
OnlyFans Animations: The OnlyFans Animations and Transitions settings are now enabled by default for all users.
Message Tracker Logging: Fixed an issue where messages created via copy-paste were not logged correctly.
Platform MyM: improved session stability for MyM.
Chat Cursor Behavior: Fixed an issue where the cursor would unexpectedly move when typing in the chat search bar.
Restricted Words to Message Guard Migration: All organizations have been fully migrated from the Restricted Words system to Message Guard. Custom words and settings flags were automatically transferred.
Translator: A glossary is now available for the Native English → German language pair in the AI Translator.
Mobile Sidebar Icons: Fixed an issue causing sidebar icons to display incorrectly on mobile devices.
Billing Avatar Size: Corrected avatar size display in the Billing tab.
Onboarding Flow: Fixed button and icon sizing in the onboarding interface.
Auto-messages/Priority Mass Messages: The Active Chats filter now includes OF welcome message and messages sent by fans (currently in the test mode).
Traffic Metrics Export: Added ability to export Traffic Metrics table in CSV and XLS formats.
Traffic Metrics Performance: Improved data loading when using Rolling Attribution.
Platform Subs.com: Enhanced session verification for improved reliability on the Subs.com platform.
Priority Mass Messages/Dynamic Lists: Fixed an issue where the Subscribed Within filter excluded trial and promotional subscriptions. All subscription types are now included.
Auto-messages/Priority Mass Messages: Resolved an issue with incorrect handling of Custom Name in campaigns.
Message Guard: Access to the new feature is now available.
Manual Dynamic Lists Sync: Added the ability to manually sync lists (maximum once per hour).
Dynamic Lists Sync Status Display: The sync status column now clearly displays states such as In Queue, Not Synced, or Syncing for easier monitoring.
OnlyFans Animation Settings: Added a new setting to disable animations on OnlyFans.
GIF Sending Logging: Implemented logging for all GIF sending activity.
Chat Performance: Optimized chat performance for smoother operation.
Fan Info Widget Loading: Improved the Fan Info widget loading speed.
SPA Logout: Resolved logout issues on single-page application (SPA) pages.
Chat Hiding Permission: Fixed 'Chat Hiding & Fan Blocking' permission on the fan profile page.
Buying Power Display: Corrected errors in retrieving and displaying buying power data in the chat list.
Traffic Metrics Tags: You can now create and assign on the Traffic Metrics page.
Message Tracker Auto-Display: Messages now load automatically when the table is at the top position. The notification banner only appears when the table is scrolled.
Message Tracker Timezone: Message Tracker now fully aligns with the user's local timezone. Time range selection no longer includes messages from previous or future days.
Deleted Member Display: Deleted team members are now shown by their last known username in Message Tracker. Permission Rename: The "Message Hub" permission has been renamed to "Message Templates" for improved clarity. .
Account Settings: Owners are no longer shown in the Assign Members list within Account Settings.
Auto-Follow and Auto-Promo Tabs: Fixed a 500 error that occurred when these tabs were accessed in agencies without any connected accounts. .
Dynamic Fan Lists: Access to is now available.
Auto Messages: Improved sending speed for large accounts by optimizing how the system checks for fans who have restricted the account.
Priority Mass Messages: Increased delivery speed by pre-filtering fans who have restricted the account before sending.
Priority Mass Messages: Added "Created at" column.
Custom Name Display: Resolved an issue where custom fan names were not displaying correctly in Mass Messages. Custom names now load and appear properly.
Mobile Table Display: Fixed layout issues affecting how tables display on mobile devices. Tables now render correctly across screen sizes.
Fast OnlyFans Send Button: Enhanced functionality to prevent message text duplication in the input field.
Fast OnlyFans Send Button: Fast send message setting is now enabled for all users. The setting can be disabled via OnlyMonster.ai → Settings → Disable Fast OnlyFans Send Button.
Message Tracker: Access to the is now available.
Priority Mass Messages: Control panel now displays only OnlyFans accounts.
Traffic Metrics: Revenue from subscriptions is now also included in Traffic Links earnings.
Unsend Permission for OnlyFans: A new permission has been added to control the ability to unsend OnlyFans mass messages.
Instantly Unlock Send Button on OnlyFans: Improved behavior of the “Send” button on OnlyFans. This update reduces accidental message duplication caused by multiple clicks.
Priority Mass Messages V2: Access to is now available.
Auto-Messages: Fixed bug where messages from the same campaign were being duplicated.
Auto-messages: Enhanced performance and sending speed of Auto-message campaigns.
OnlyFans Page Loading: Fixed slow loading and page freezing issues related to OnlyFans style updates.
Telegram Platform: Added a Fan’s Overview widget.
OnlyFans Page Settings Widget: The Settings Widget has been relocated to the right side of the screen for better accessibility.
OnlyFans Permissions: Introduced a new permission: "Statements (Earnings Statistics)". When enabled without the main “Statements” permission, users will only see earnings statistics, while other Statements data remains hidden.
Age Display in Fans Overview: Updated age calculation logic in Fans Overview. Age can now be displayed even if the fan’s exact date or year of birth is not provided.
OnlyFans Permissions: Fixed the issue where the Chats Hiding & Fan Blocking and Mute Chats permissions were not functioning properly..
Widget Dark Theme: Widgets now correctly adapt to the platform's color theme.
Telegram Permission: When disabling the Gift permission, the page now refreshes automatically to apply the change.
Priority Mass Messages: Campaigns that have been stopped for 7 days or longer are now automatically archived. A warning message has also been added to the campaign creation page to inform users about this behavior.
Billing Tab: Added a new account ID column for easier account identification and management.
Traffic Metrics: Released a new version of the feature.
Translator Styles: Fixed styling issues in chat.
Telegram Chat Translator: Added translator widget to Telegram chats.
Fansly - Purchase Permission Logic: Updated behavior of the "Purchase Media & Leave Tips" permission. The $ icon is now hidden in chat for users without the permission, while the PPV creation icon remains visible to allow sending paid text messages.
OnlyFans - Message Reporting: The "Hide" and "Report" buttons in received messages are now hidden for users who don’t have the "Chat Hiding & Fan Blocking" permission.
OnlyFans - Fan Persona Translator: Fixed translator functionality within the Fan Persona feature.
Fansly - Fan’s Overview Widget: Added Fan's Overview widget support for the Fansly platform.
Fansly - Translator: Added translator support for general chats. The widget is located on the right side of the screen.
Fan’s Overview Widget – Country Selection: You can now delete a previously selected country.
Fan’s Overview Widget – Location Display: Full country and state names are now displayed for improved clarity.
Fan Notes: Fixed an issue where fan notes were not saved correctly when switching between chats.
Fanvue - Account Connection: Fixed a 500 error that occurred when adding a Fanvue account.
Translator - Source Language Sync: The selected source language is now remembered and synced across all open tabs.
Templates - Sending Speed: Reduced template sending time from 3 seconds to 0.5 seconds.
Telegram - Re-login Stability: Improved the stability of the re-login process on Telegram.
Alphabetical Language Sorting: Languages in the translator widget are now listed in alphabetical order.
Translator Scrollbar Styling: Enhanced the appearance of the scrollbar in the translator widget for better usability.
Language Detection Display: The translator now shows the name of the detected language next to the auto-detected text.
Chat List Translation Flickering: Fixed flickering issues when translating the chat list in smaller window sizes.
Fans Overview Time Display: Corrected time display issues for the USA timezone in Fans Overview.
Page Translation Widget Positioning: The translation widget is now docked on the right side of the screen.
Fans Info Widget Redesign: Launched a refreshed design for the Fans Info Widget (Spenders Online and Fan's Overview).
Fan Notes Display: Fan Notes are now visible directly in the Fans Info widget on the right side of the screen.
Translator - Native Mode Expansion: Native Mode is now also available for German-English language pair.
Translator - Auto Detection: Added "Auto Detection" option. When opening the widget, it will automatically display the detected language, e.g., "English (detected)".
Fan Persona - Analytics Limit Increased: The Fan Persona now analyzes up to 800 recent messages (increased from the previous 200 limit).
Delete Media from Vault Permission (Update): This permission no longer controls the ability to rename folders in OnlyFans Vault.
Add Media & Update Categories (OnlyFans Permission): Users without this permission can no longer upload media through the video editing interface.
Auto-messages - Chat: Messages sent by Auto-message campaigns now display "Auto-message campaign" label in the sender name area.
Telegram – Translator Widget: A translator widget has been added to Telegram chats, allowing seamless message translation directly within the interface.
Translator – Theme Support: The translator widget now automatically adjusts to light or dark theme in both Telegram and Fansly, matching the user’s UI settings.
Fansly Translation Widget: Added translator widget to Fansly chats.
OnlyFans Styles: Updated OnlyFans styles and improved performance.
Translator Widget Position: Enhanced Widget positioning for better usability.
Translation: Fixed page translation for certain languages.
Translation: Fixed translation language memory functionality.
Translator: Fixed hotkey usage Alt+S (Windows) and Option+S (macOS) when the Translation widget is closed.
Creator Tooltips Control: Added ability to disable Creator tooltips through settings (Onlymonster.ai → Settings → Disable Creator Tooltips in Side Bar).
Translation Widget: Introduced a new translator widget on the OnlyFans platform.
Fansly - Enhanced Permission Logic: The Subscribe button is now hidden when users don’t have the "Purchase Media & Leave Tips" permission.
OnlyFans - Edit Highlights Restoration: The Edit Highlights feature has been restored and is now available without requiring the "Chat Hiding & Fan Blocking" permission.
Fansly - Enhanced Chat Moderation: Users with this permission enabled can no longer block and mute fans through posts.
OnlyFans - Statistics Permission: The page no longer requires the Statistics permission to access and manage the payout system.
OnlyFans Help & Support Permission: The appeal submission page is now controlled by the Help & Support permission.
Follow-up Messages: Stabilized and refined the Follow-Up Messages feature for improved user experience.
Auto-Messages – Media & Paid Campaigns:
You can now include media files (both free and paid) in Auto-Messages.
Added support for creating paid text campaigns.
Campaign sales statistics are now visible directly on the Auto-Messages dashboard for quick performance tracking.
Welcome Messages - Active Chat Logic: Welcome messages now have a fixed 24-hour "Active chats" period and can no longer be customized. If a chatter initiates a conversation with a new subscriber within this 24 hour window, the Welcome message will not be sent.
Exclude Lists - Update Frequency: Exclude lists are now refreshed every 30 minutes (previously once every 24 hours) allowing for more accurate and responsive targeting during campaign creation. .
Translation Cache: Fixed cache issue that was causing outdated incorrect translations to appear.
Media Hub Auto export to OF: Restored export functionality to OF Vault through messages.
Automessages: Disabled resend option for all messages. Resend functionality now only works if messages were unsent from chat.
Content Blur: Added content blur functionality for OnlyFans, Fansly, Fanvue, Reddit, and Telegram platforms. Blur icon is located on the right side of the screen.
Subs Platform: Improved account connection reliability and functionality
Platform Stability: Improved platform stability under increased load conditions.
Sender’s Name Logging: Enhanced Sender’s name logging for messages, posts, and mass messages during unstable WebSocket connections.
Role and Group Filters: Updated the Role and Group filter functionality in Chatter Metrics and Chatter Shifts. The previous 100-member limitation has been removed.
Fanvue Platform Notifications: Added notification and message counters for Fanvue accounts, along with desktop notifications for new messages.
Platform Stability: Improved handling of Cloudflare responses for greater overall system stability.
Proxy Management in Account Connection Flow: .
Telegram Platform - Authorization Flow: Hidden the pop-up message during phone number authorization.
Telegram Platform - Master Tab Update: The Master tab is now marked with an icon in the bottom right corner and can no longer be refreshed.
Fansly - Purchase Media & Leave Tips Permission: The Purchase Media & Leave Tips permission no longer affects the ability to view received bulk media files.
Sender’s Name Display: Fixed logging issues for messages when sending templates, AI suggestions, and copied messages.
Sender Name Display: Fixed sender name display issues when sending Follow-ups and Priority Mass Messages
Sender’s Name Display - Removed Member: The senders’ name is now retained and visible in messages and posts even after a team member has been removed from the agency.
Cloudflare Captcha: Accessing OnlyFans profiles no longer requires solving Cloudflare captcha verification.
Permission Changes Optimization: The page no longer reloads after making permission updates.
Custom Timezone (OnlyFans): When enabling custom time zones in Creator settings, the page now refreshes automatically and applies the timezone correctly.
Follow-up & Chat Timer Display: Time now displays correctly in follow-ups and chat timer start indicators.
Chat Hiding & Fan Blocking Permission: Users without the proper permission can no longer block fans through the profile page and stories interface.
Auto-messages: Fixed issues with the following filters "purchased … creator" and "purchased … agency".
Muted Chat Exclusion: Users without the "Mute Chats" permission can now exclude the Muted List when creating OnlyFans Mass Messages.
Conditional Group Display: The Sidebar now only displays groups containing creators that the team member has access to.
AI Model Selection: The AI model selector in chat has been removed. All requests are now automatically routed through our advanced AI model.
Notes Enhancement: Maximum note size increased to 10,000 characters (including spaces).
Telegram Session Security: Switching to the "k" version in Telegram sessions is now blocked to enhance session stability and security.
Fans Overview - Time Display: Time is now displayed correctly according to the fan’s local timezone.
Chargeback Date Display: The Last chargeback date in Fans Overview now displays as a whole number of days.
Fans Overview - Time Display: Time is now displayed correctly according to the fan’s local timezone.
Profile Picture Label: The profile picture label now correctly reflects the fan’s last purchase activity.
Last Purchase (Fan’s Overview): Last purchase date now displays accurately in the fan’s profile.
Color Chat Splitting: Added a new Color Chat Splitting system that supports up to 6 colors.
Statistics Permission Logic: Users with access to OnlyFans Mass Messages but without the Statistics permission will no longer see earnings data.
Media Hub: Removed the auto-export flow that required adding a fan account link.
Media Hub: Media is now exported to the OnlyFans Vault via scheduled posts.
Telegram added to the list of supported platforms in OnlyMonster.
Initial integration includes:
Proxy support
Assigning profiles to team members
Shift-based access
Message counter
OnlyFans Mass Message Unsend: Users can now unsend OnlyFans mass messages directly via Statistics → Engagement → Messages → Mass Messages. To unsend mass messages, the OF Mass Messages permission is required (the OF Statistics permission is no longer needed for this action).
OnlyFans Mass Message Sender Name in Statistics: The sender name for OnlyFans mass messages is now displayed in OnlyFans Mass Message Statistics (Statistics → Engagement → Messages → Mass Messages).
URL Links: Fixed issue with copied chat links displaying incorrectly. URLs now show the correct link when copied.
Media Upload Permission: Uploads are now restricted during OnlyFans media editing. Users without Add (Upload) New Media permission cannot upload photos during this time.
Collection Management: Clear & Delete Label is now available to all users, regardless of Chat Hiding & Fan Blocking permission.
Content Filtering: The Restricted Words feature now applies to Quick Reply messages.
Browser Performance: Fixed issues with search functionality and preserving the tab state after refreshing the page.
Media Hub: Fixed MediaHub modal positioning that previously blocked interaction with the background interface.
Chat scrolling: Implemented workaround to preserve scroll position when reaching the top of an OnlyFans chat.
Profile labels and Spend badges: Improved message URL matching using regex constants for more accurate rendering of profile labels and spend badges.
Desktop push notifications
Roles and permissions management